Client Help
How do I create an Account?
- Click "login" on the top right of your screen.

- Fill in all required fields then hit "Submit".
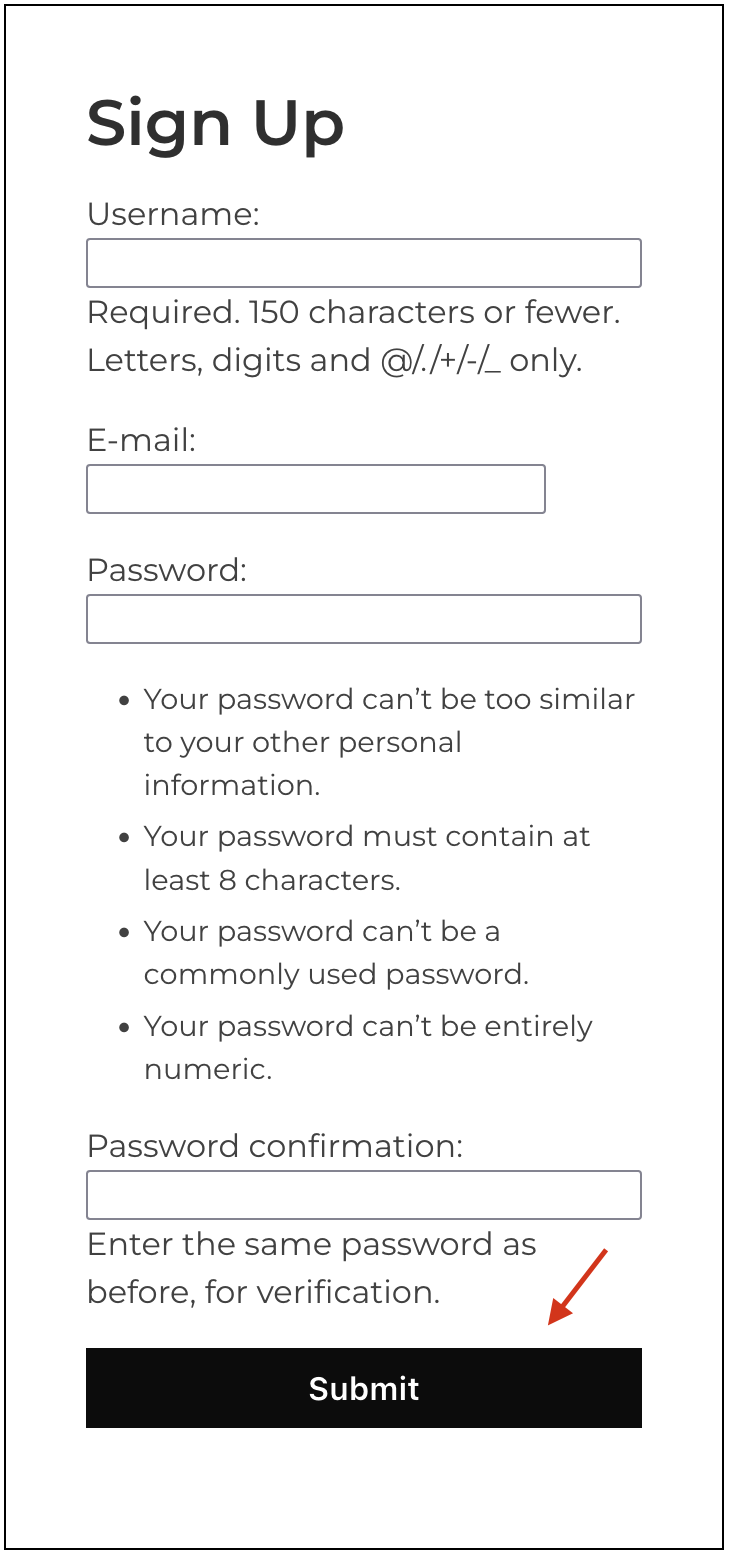
- After submitting, you will be sent a link to your email that you provided to confirm your account with us.
- Click on the link emailed to you, and viola! You successfully made an account with Casalume!
How do I start my subscription?
- Once logged in, click on "Manage Subscription" on casalumesigns.com.

- Next, pick your service option. You can either go monthly or yearly with us.
- Once you have your option selected, you will be taken to our checkout page.
- Once on the checkout page, please fill in all required information. Then hit the yellow subscribe button.
- To verify your subscription with us, click on "Payment Information" from your profile page. You should be on it already after hitting "subscribe".
- If your subscription was successful, you should see your subscription type on this page. If you are still having trouble, please email support@casalumesigns.com.
"I'm getting low on trips!" or "I have no more remaining trips!"
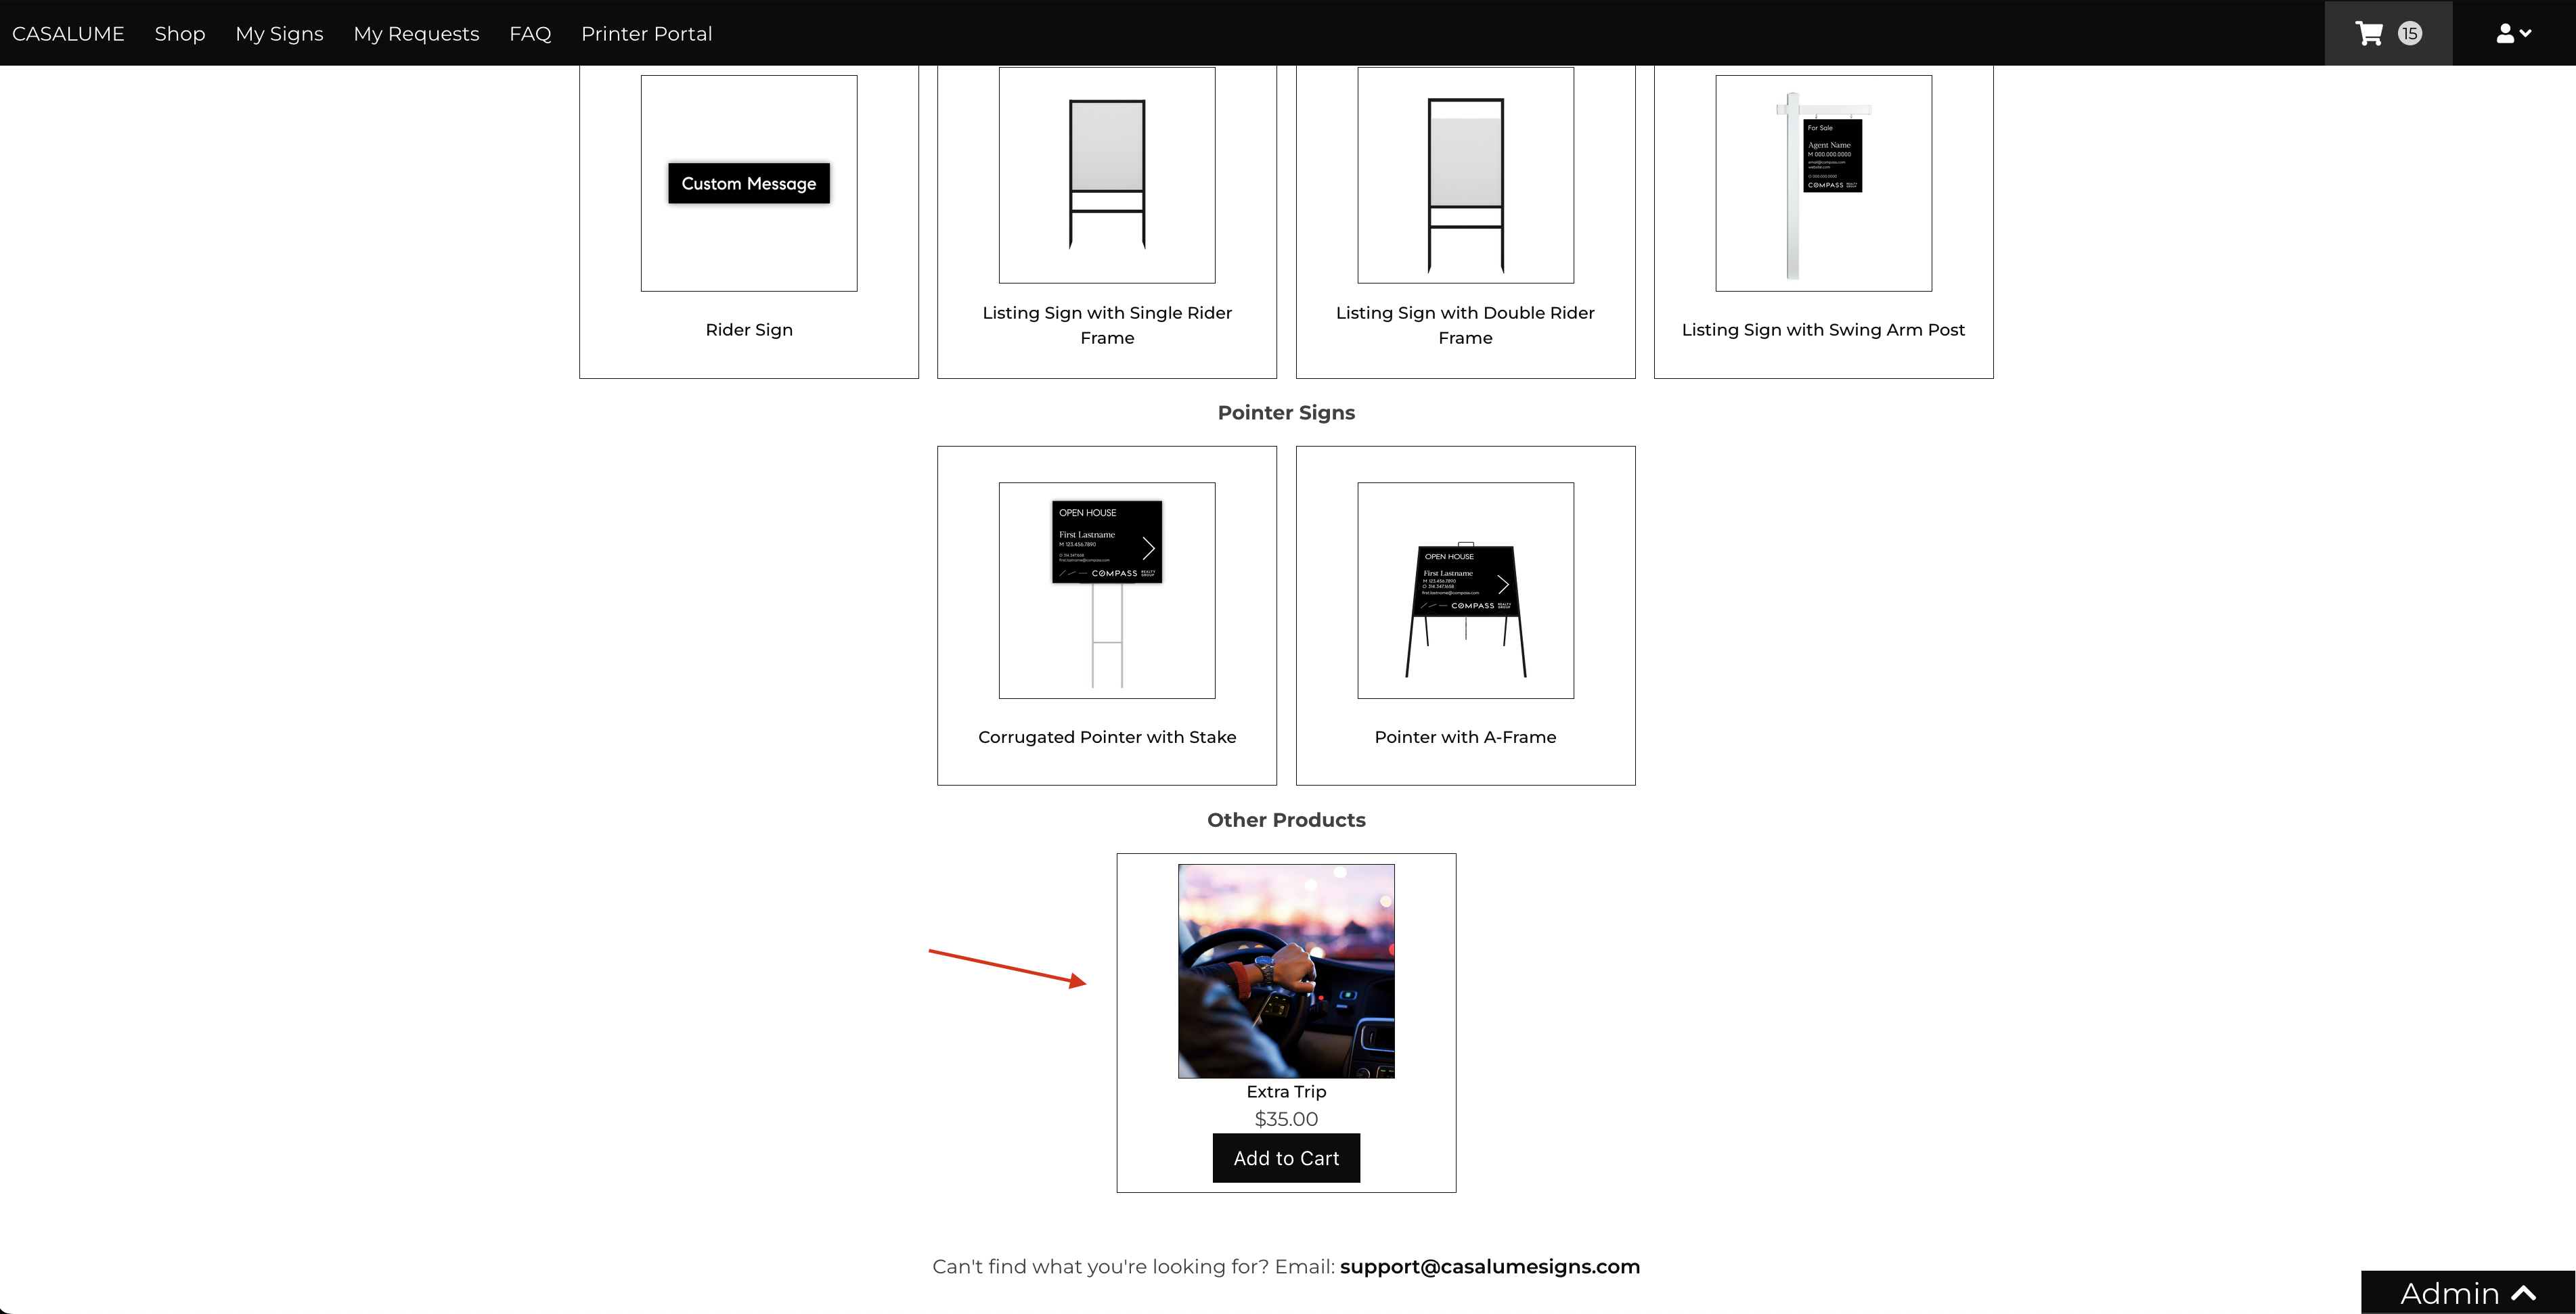
- Click here.
- Under "Other Products", click "Add to Cart" under "Extra Trip".
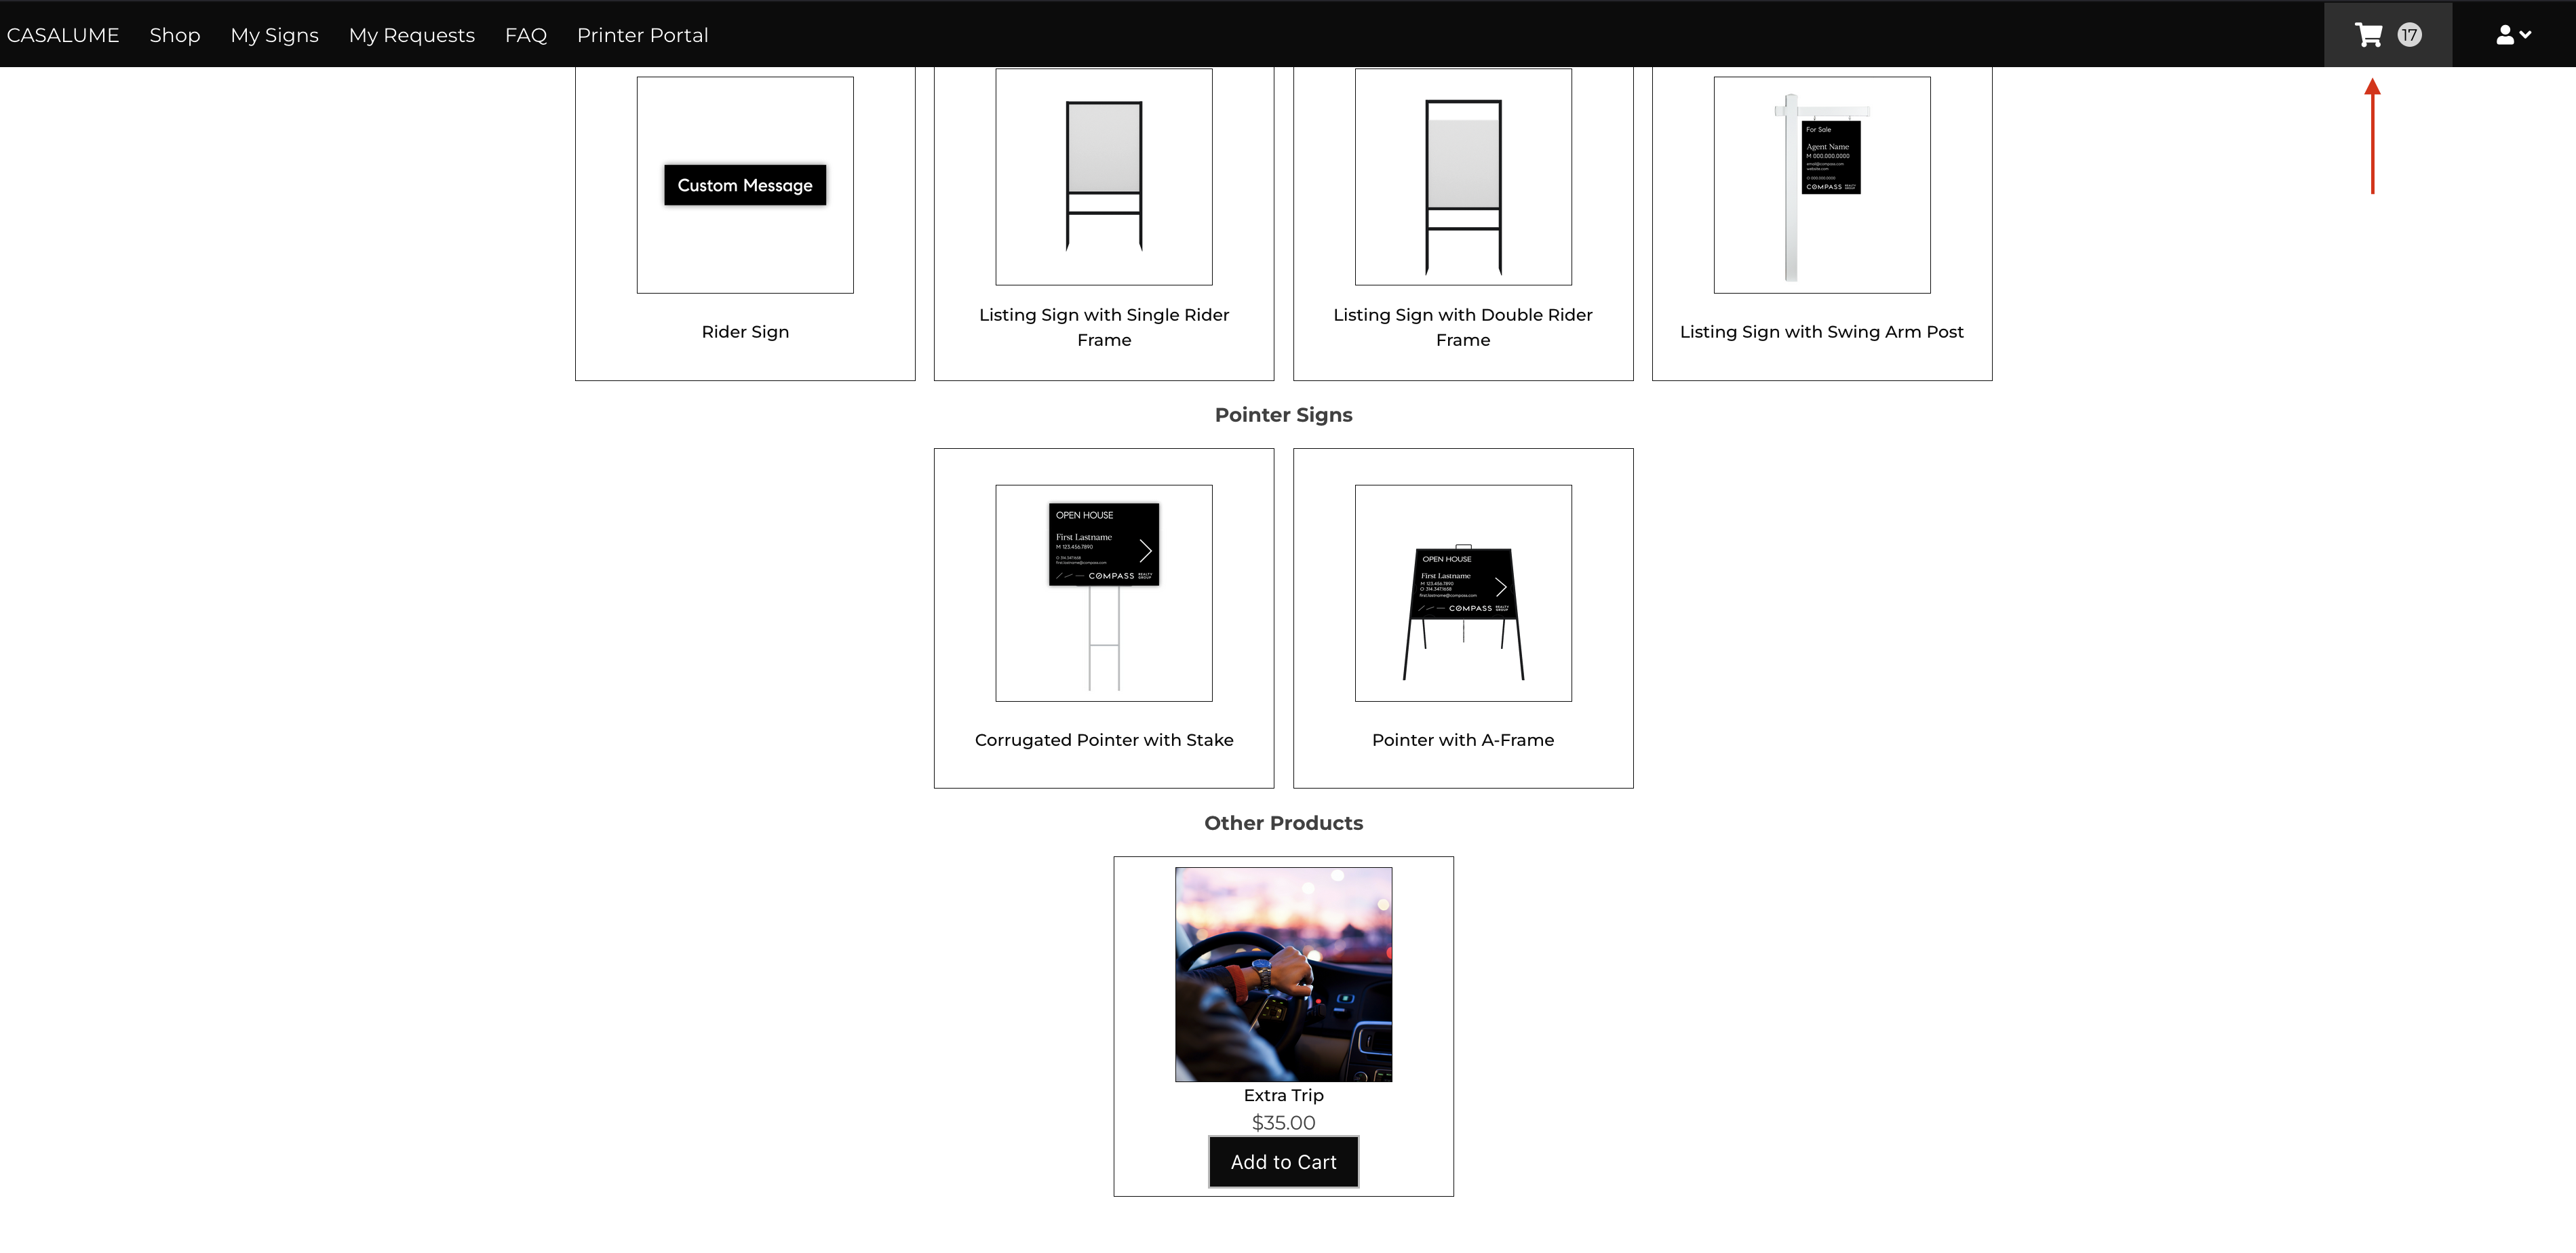
- To follow the checkout process, click on the "Cart" button in the top right corner of your screen.
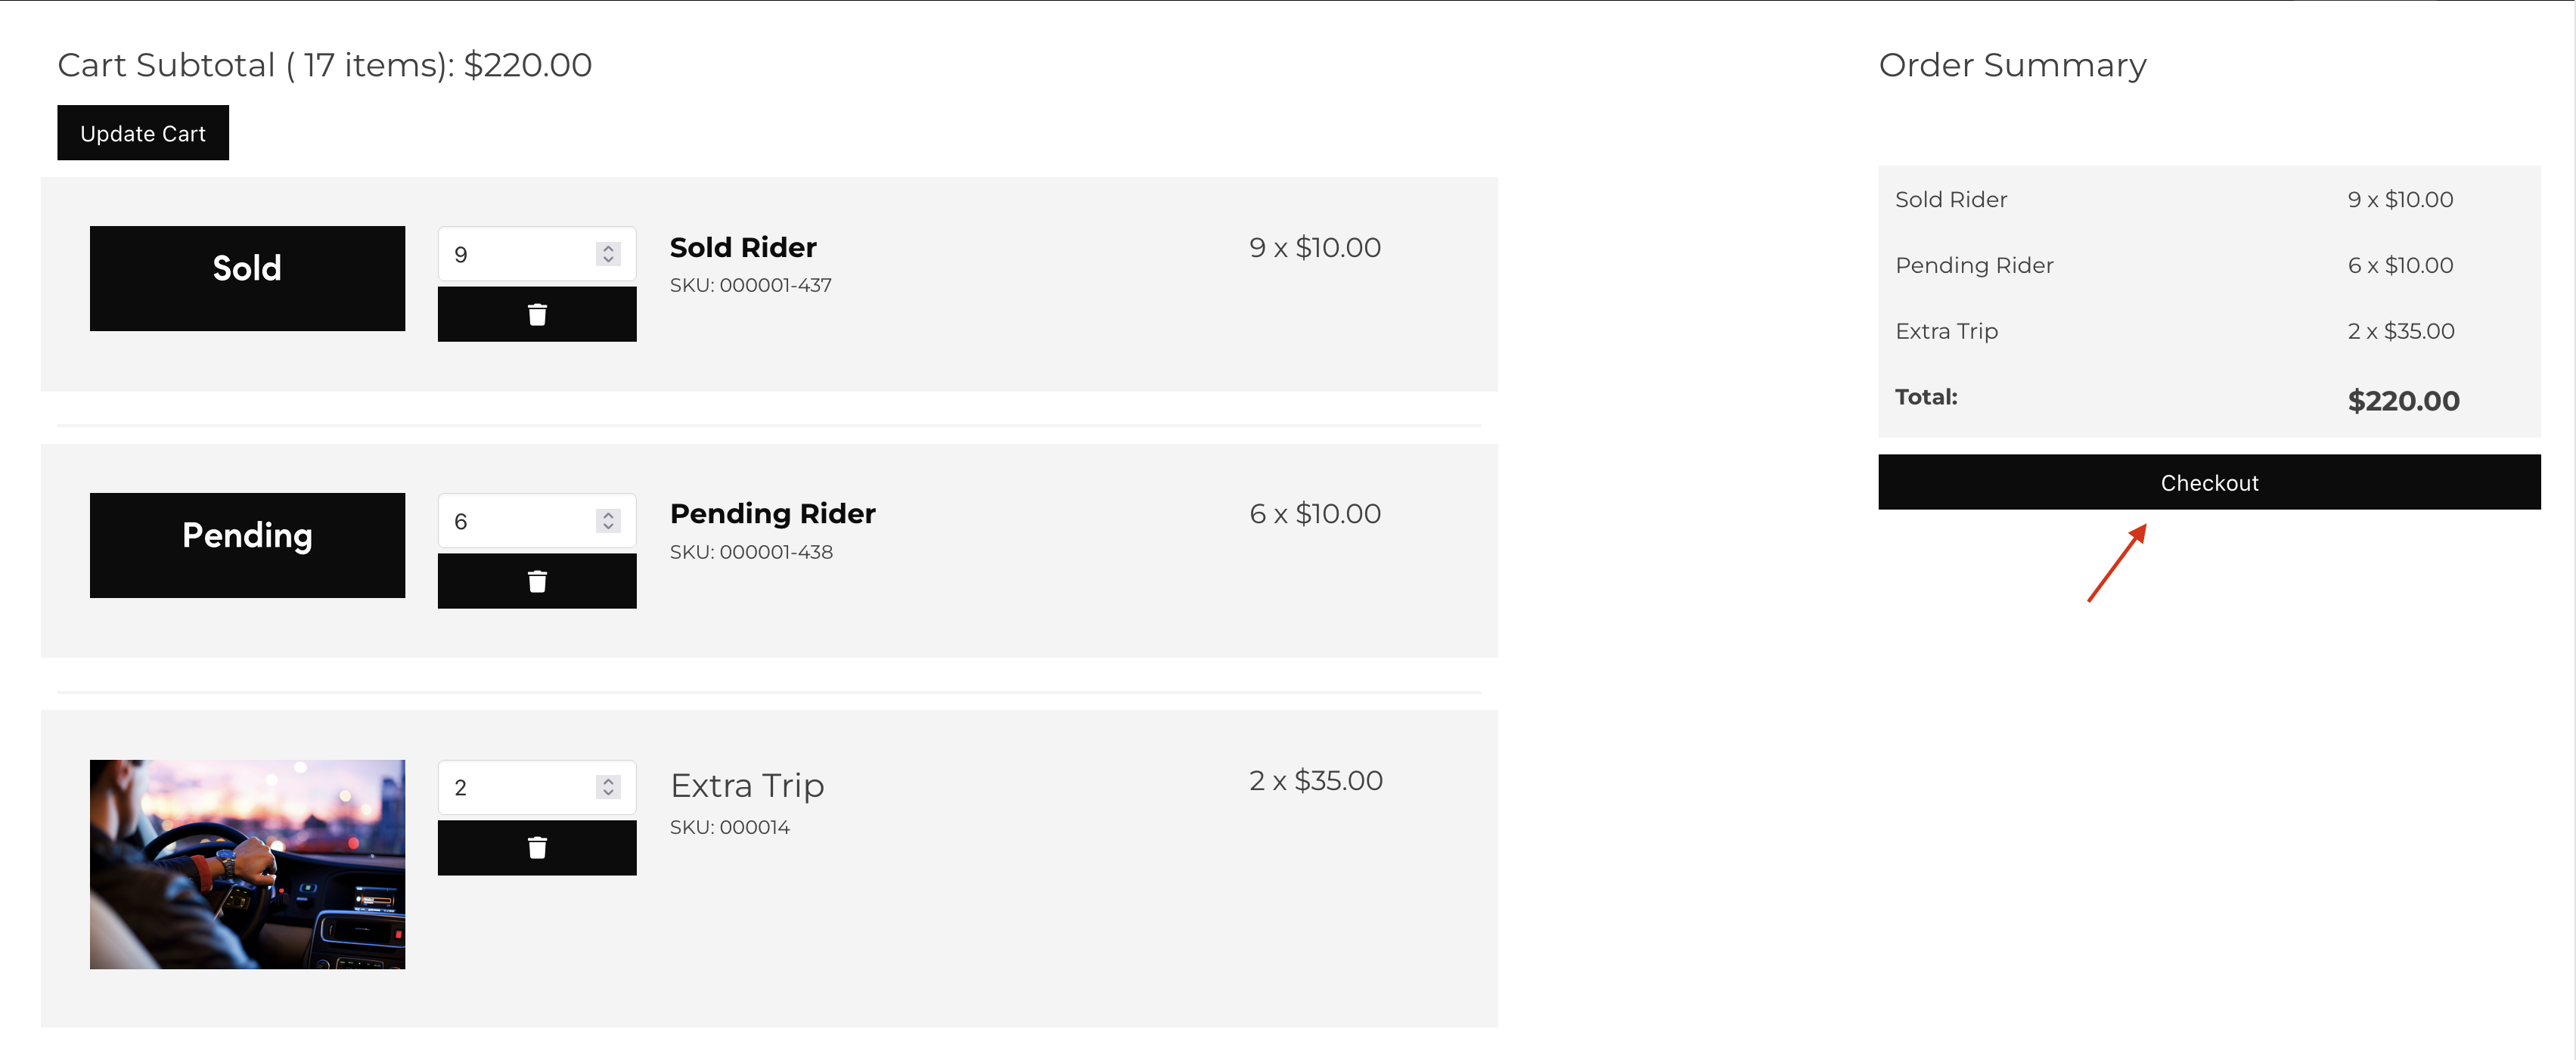
- You are now on the checkout page. Feel free to update the quantity in of your items here.
- Once you are satisfied, click the black "Checkout" button.
- Enter your payment information if you have not yet done so.
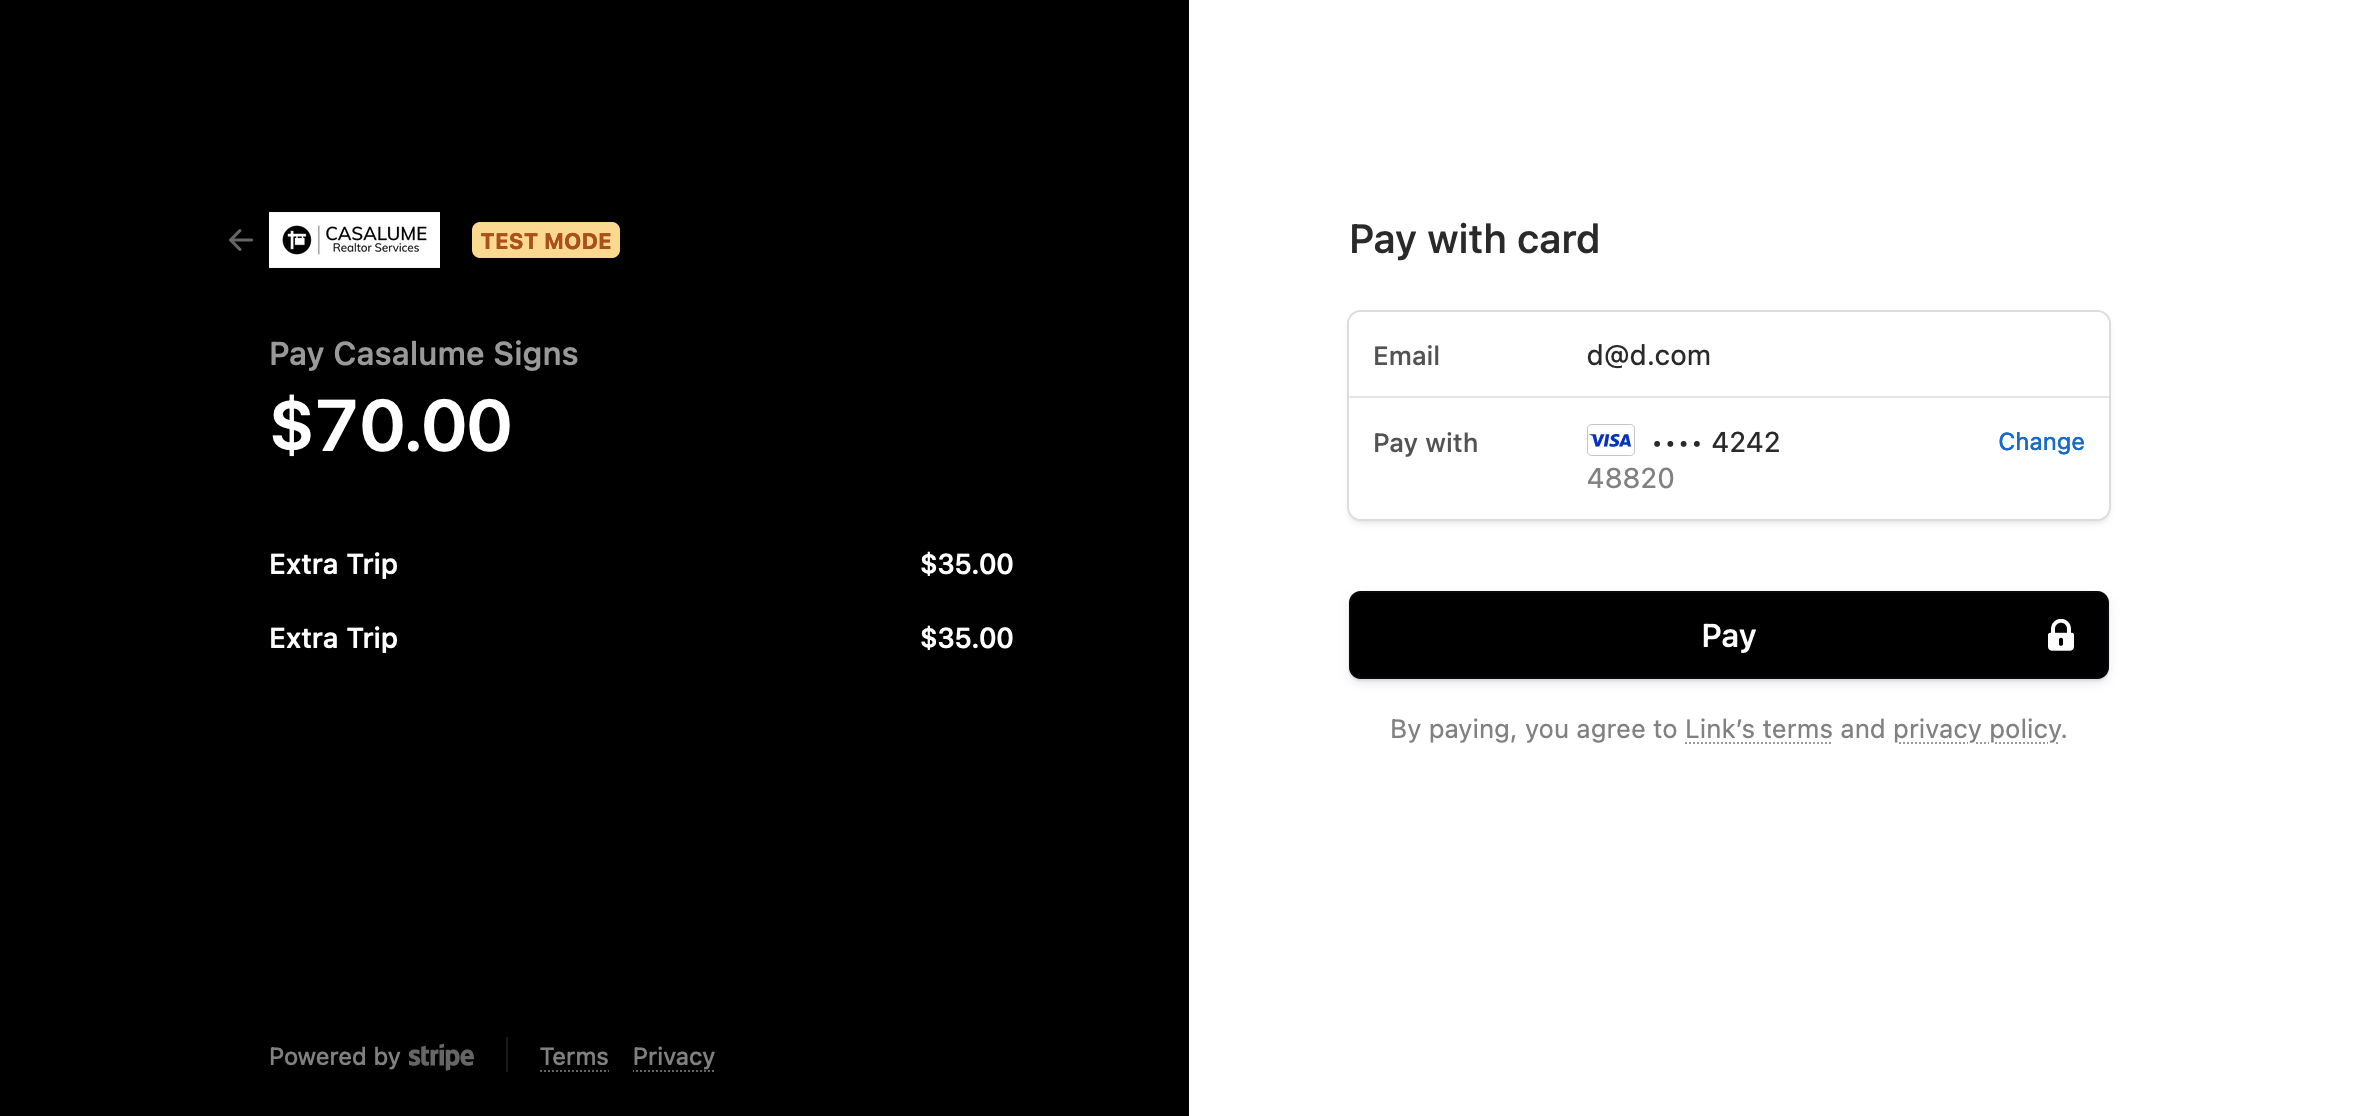
- Click "Pay".
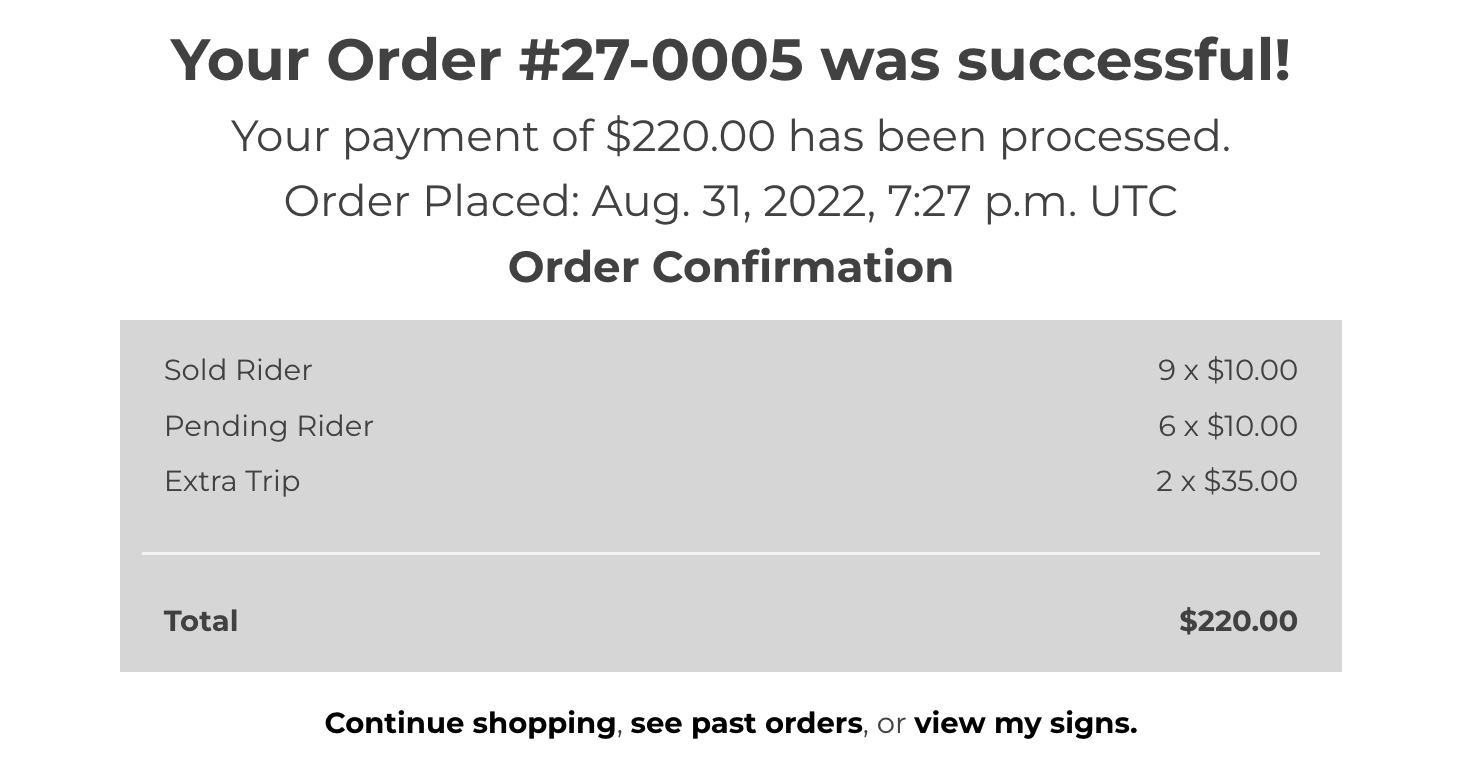
- If payment was successful, you will be taken to an order confirmation page indicating your "Order was successful!".
- Still having problems? Please email support@casalumesigns.com.
"I ordered some signs. What's next?"
Thank you for choosing us!
When you place an order for a sign, it then shows up on our end as "sign in manufacturing". When one of our admins checks in your sign, you will then receive an email saying your sign has been "checked in".
From here, you will now get the ability to install the sign you purchased with us.
How do I install one of my signs?
- Click on "My Signs" in the navigation bar.

- On this page, click on the "My Signs" tab if you are not already there. You can tell if you are on the "My Signs" tab if the color is lighter than the rest of the tabs. This also indicates the active tab. The tab is "inactive" if it is showing a grayed out color.
- If your sign has been checked-in by one of our admins, you will get the ability to schedule an installation. If your sign has not been checked in, you will see "Being Manufactured" underneath your sign.
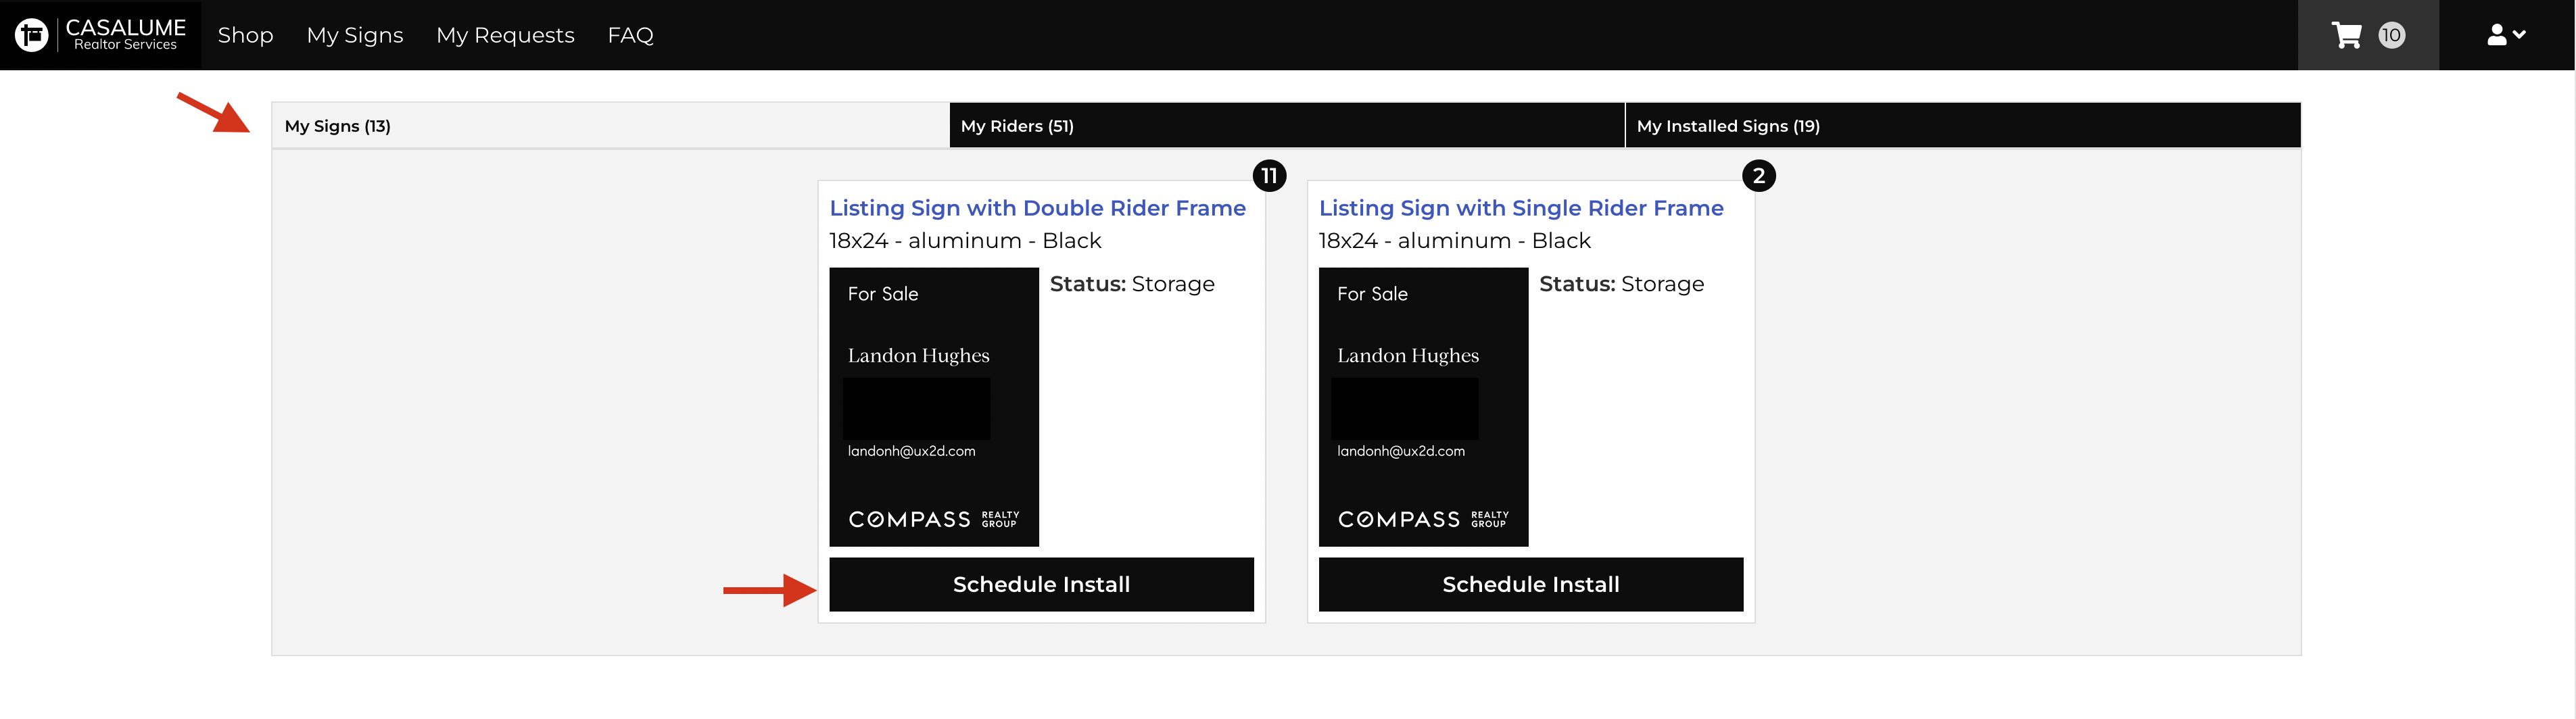
- If you see a "Schedule Install" button, click it.
- On this page, you will be asked to fill some information. This information includes your desired location, install date, top and bottom riders, additional riders, special instructions (notes), and any regulatory information.
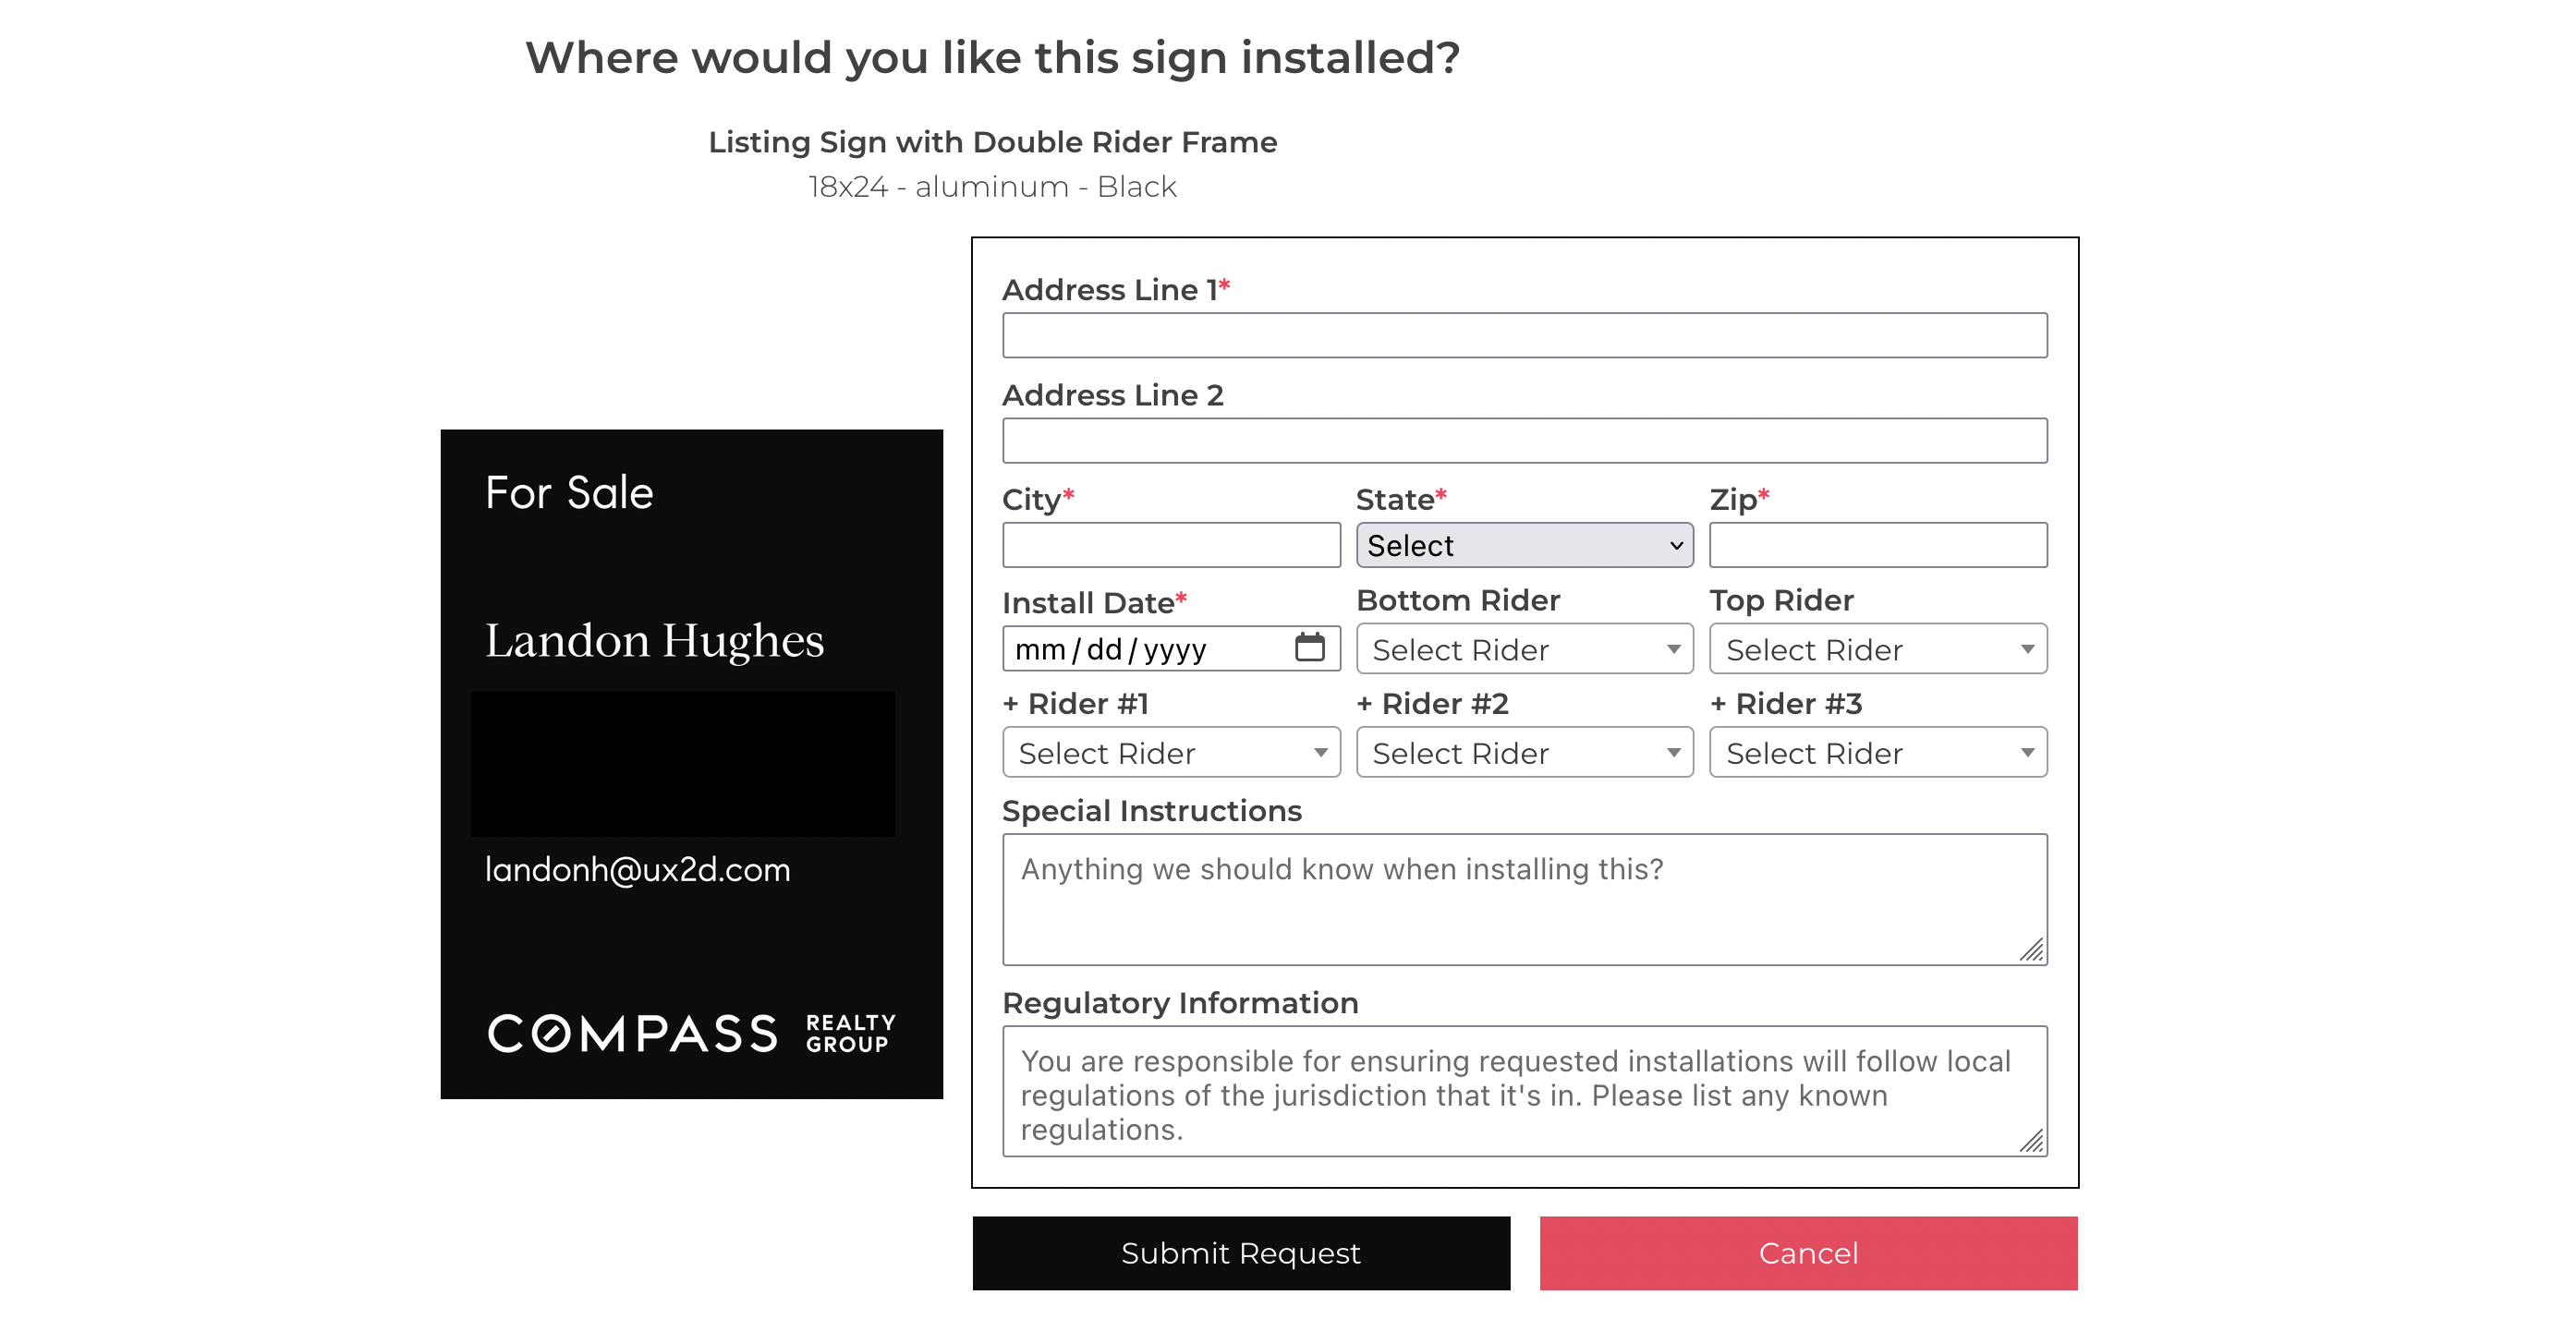 Note: We do not install signs on weekends or national holidays.
 - Once all information has been filled out, click "Submit Request".
- You will then be directed to an accuracy confirmation page. If anything is incorrect, please click on "It's not accurate" and correct your information.
- If all information looks correct, please hit "confirm".
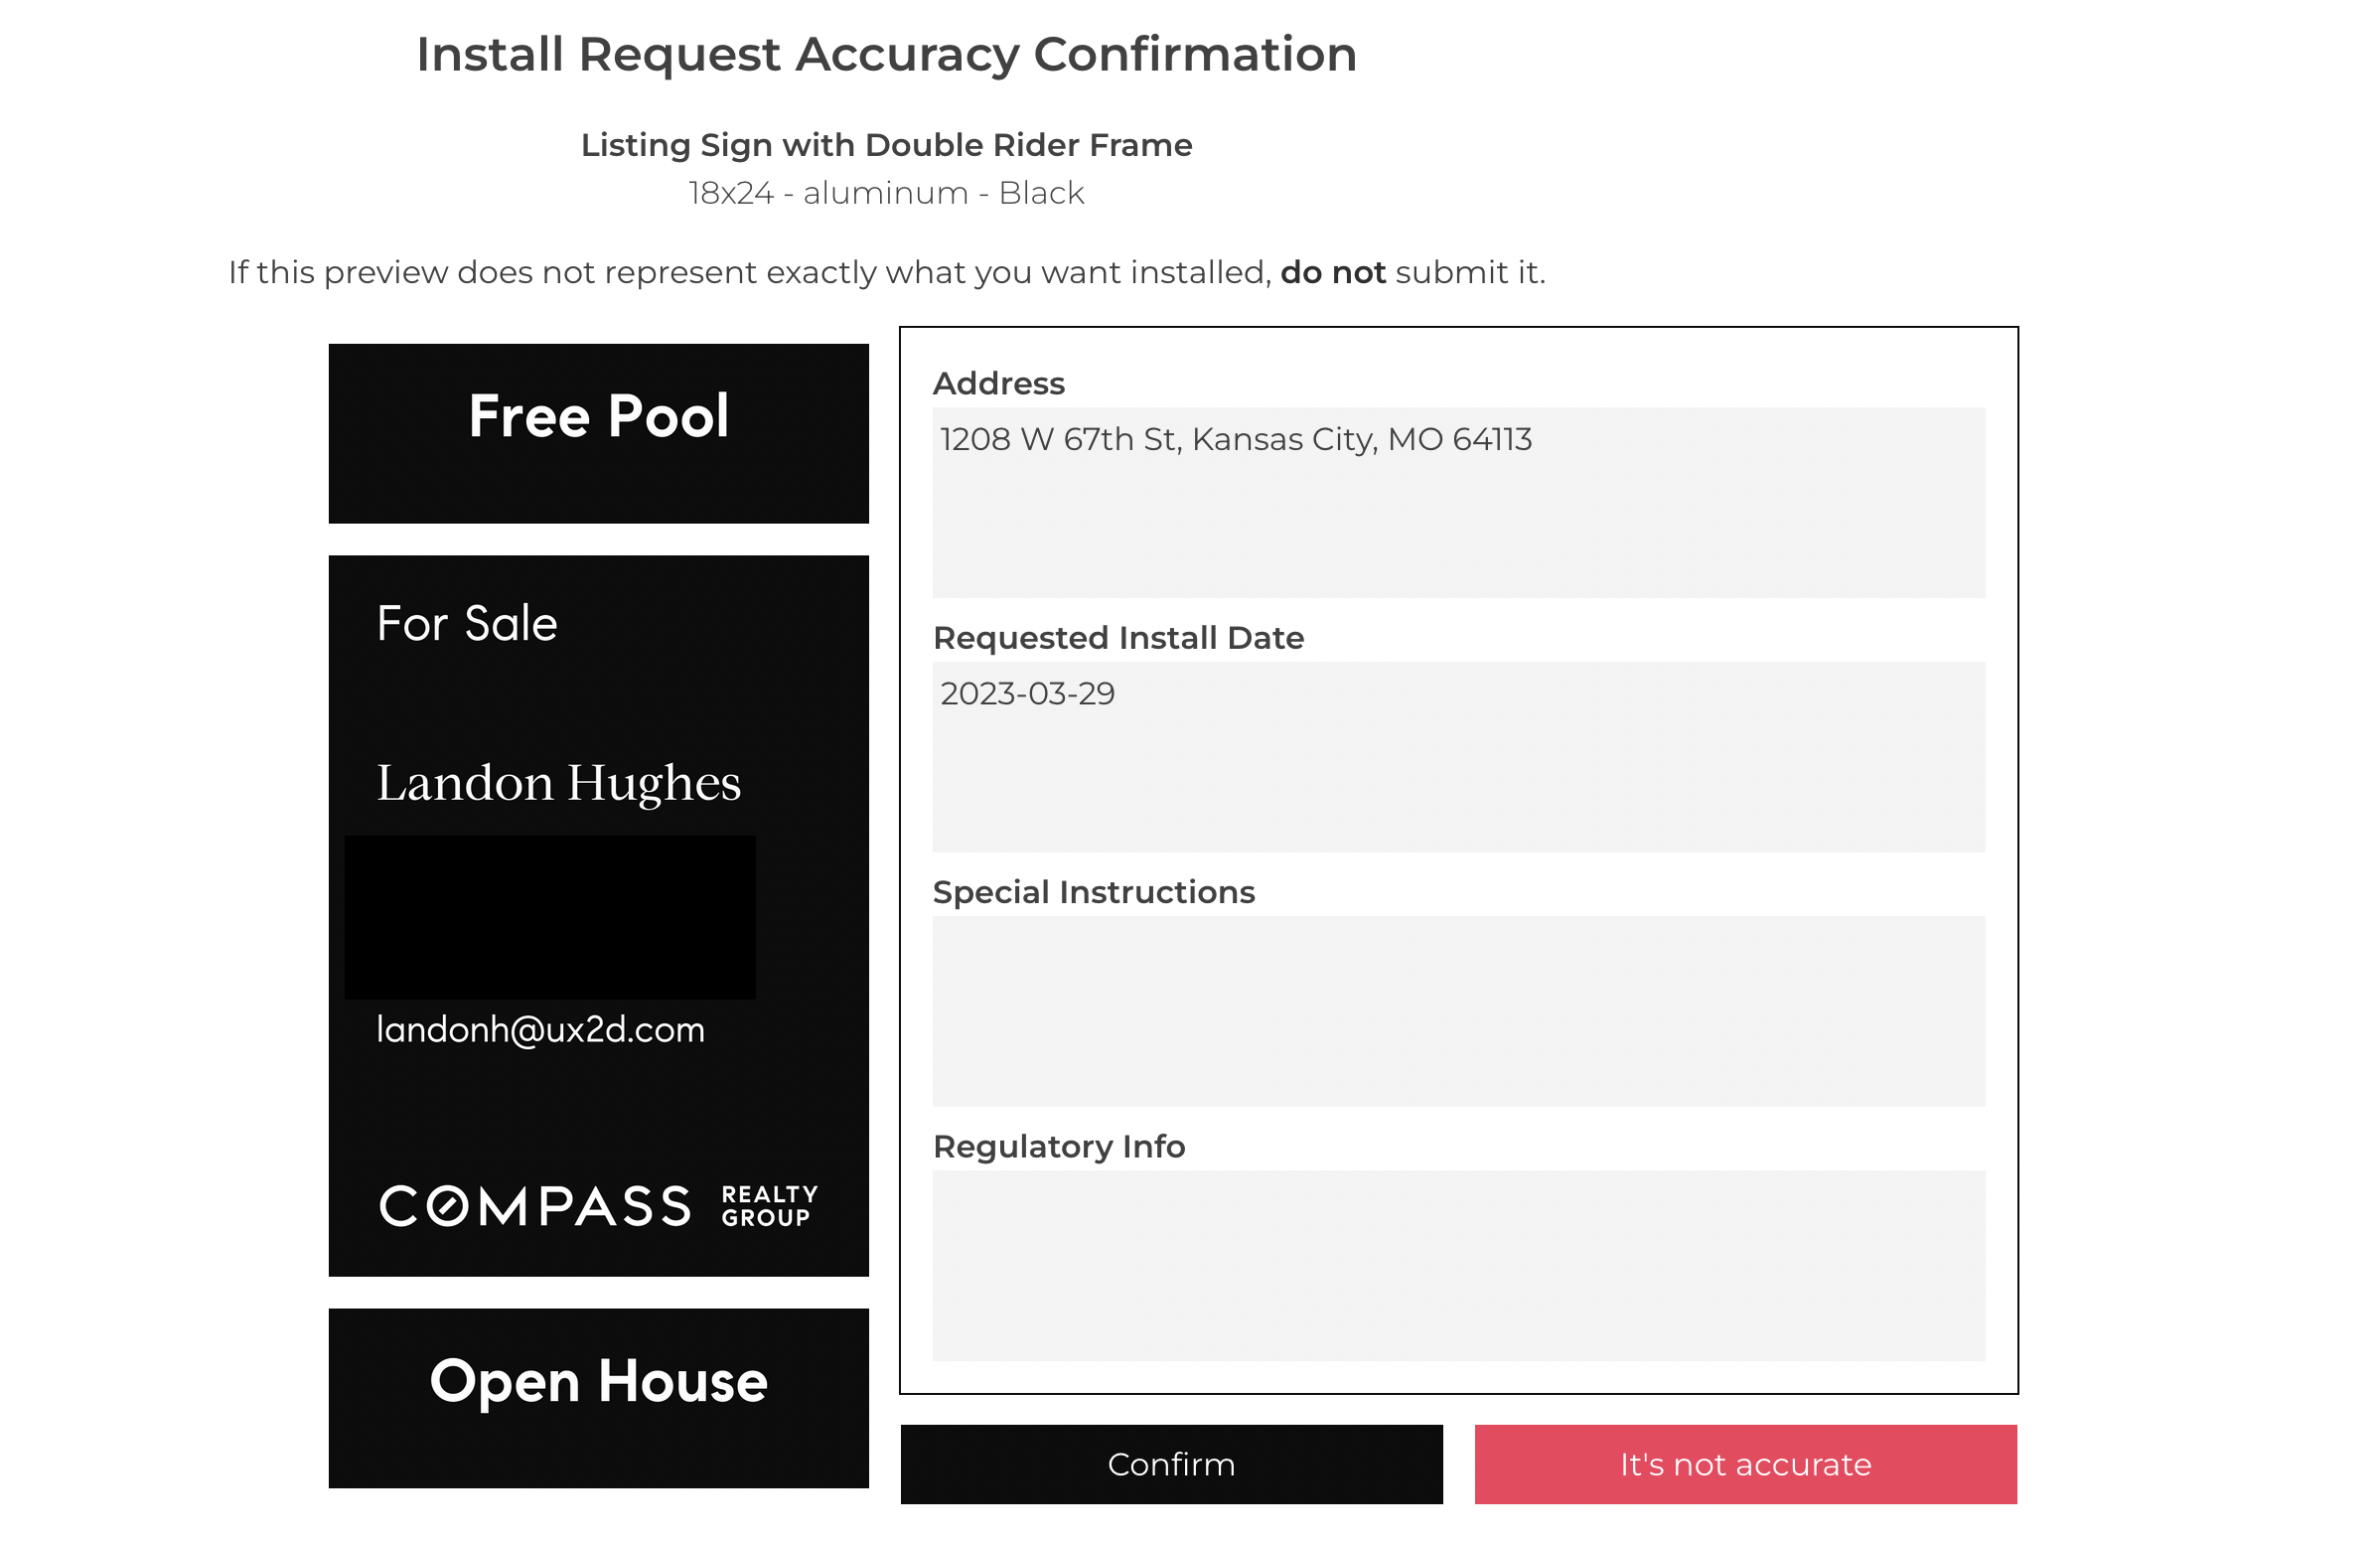
- You have successfully submitted an installation request!
- Once your sign has been approved, one of our installers will get to you shortly 👍. If there are no problems during the installation, you will get another email indicating the installation was successful.
"I need to remove a rider or swap it out with a different one."
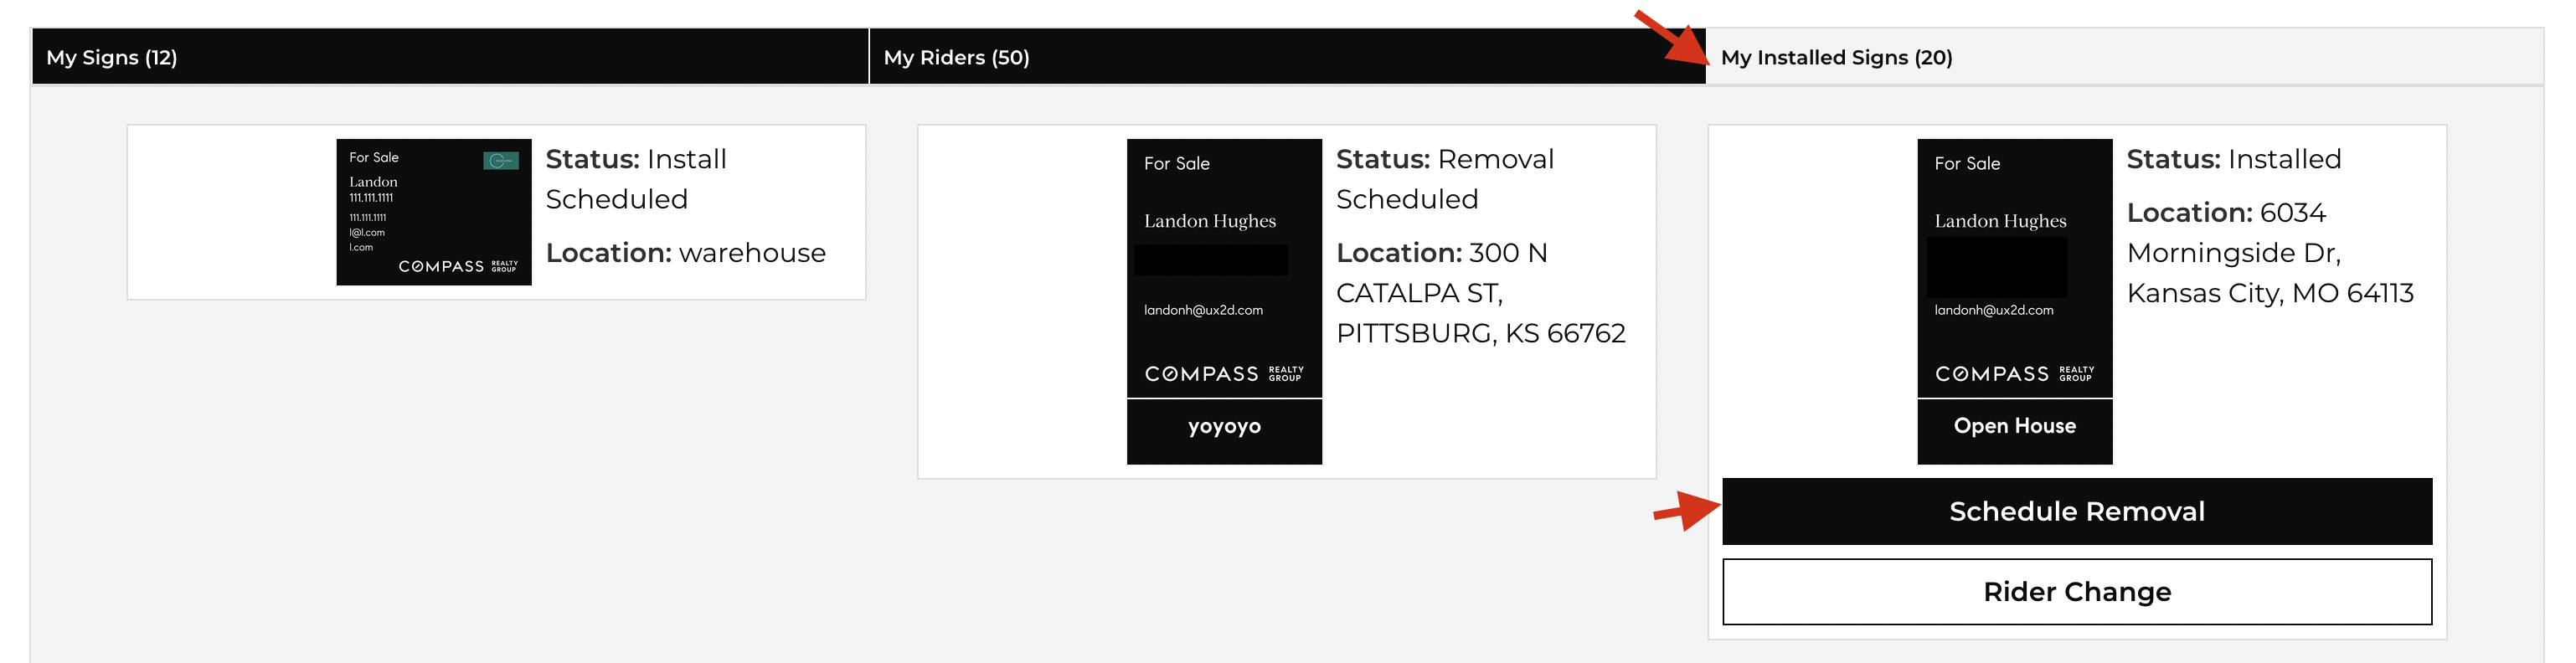
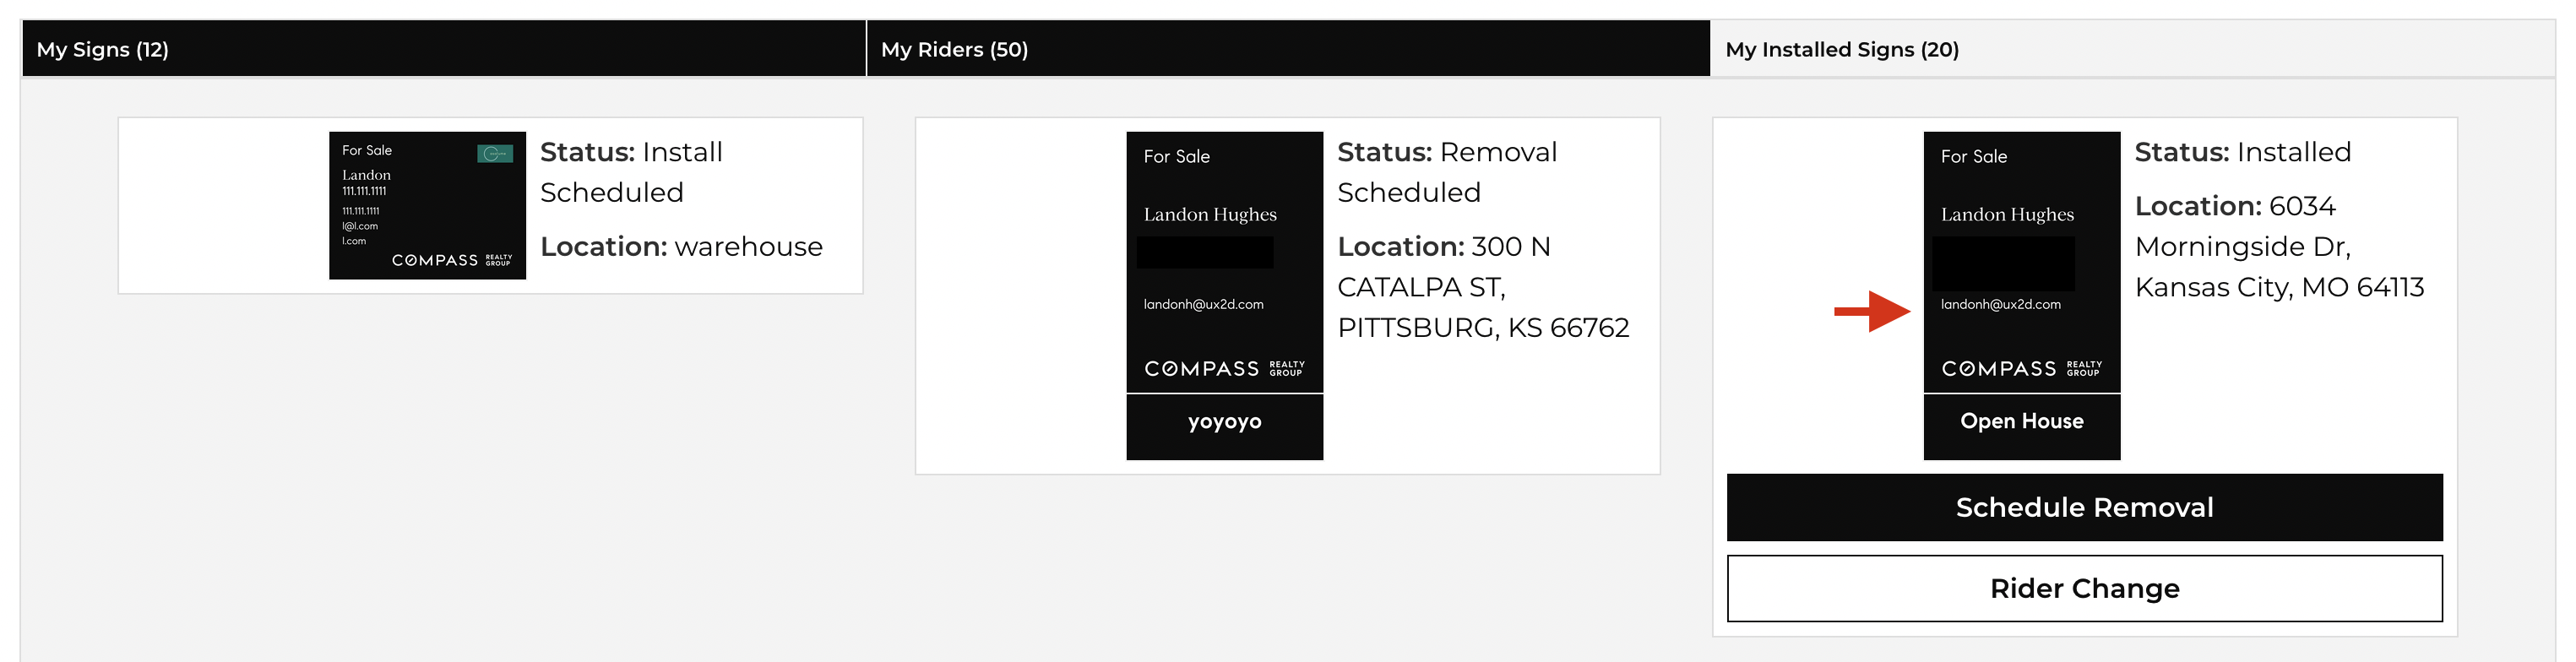
- Click on "My Signs" on the navigation bar.
- You will now be on a dashboard page. Click the "My Installed Signs" tab.
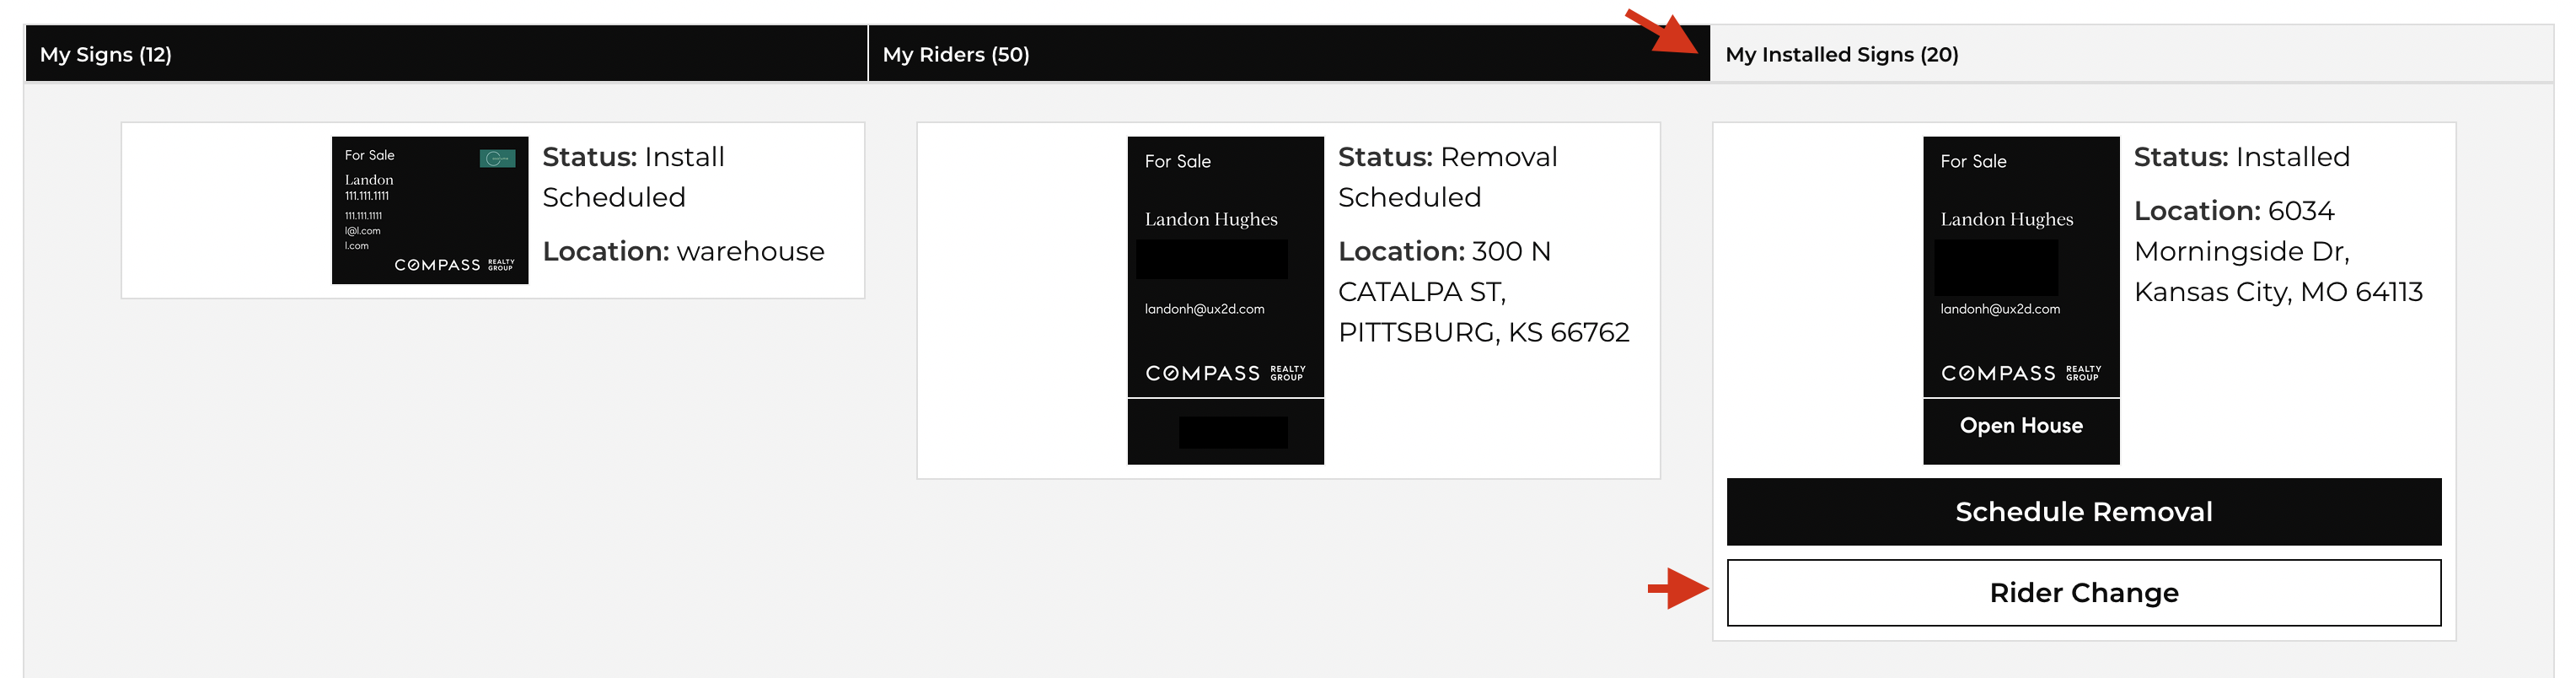
- If your sign was successfully installed, you should now see a "Rider Change" button underneath your sign. Click it.
- You will now be directed to a rider change request form. Please fill out change date and anything you'd like to modify.
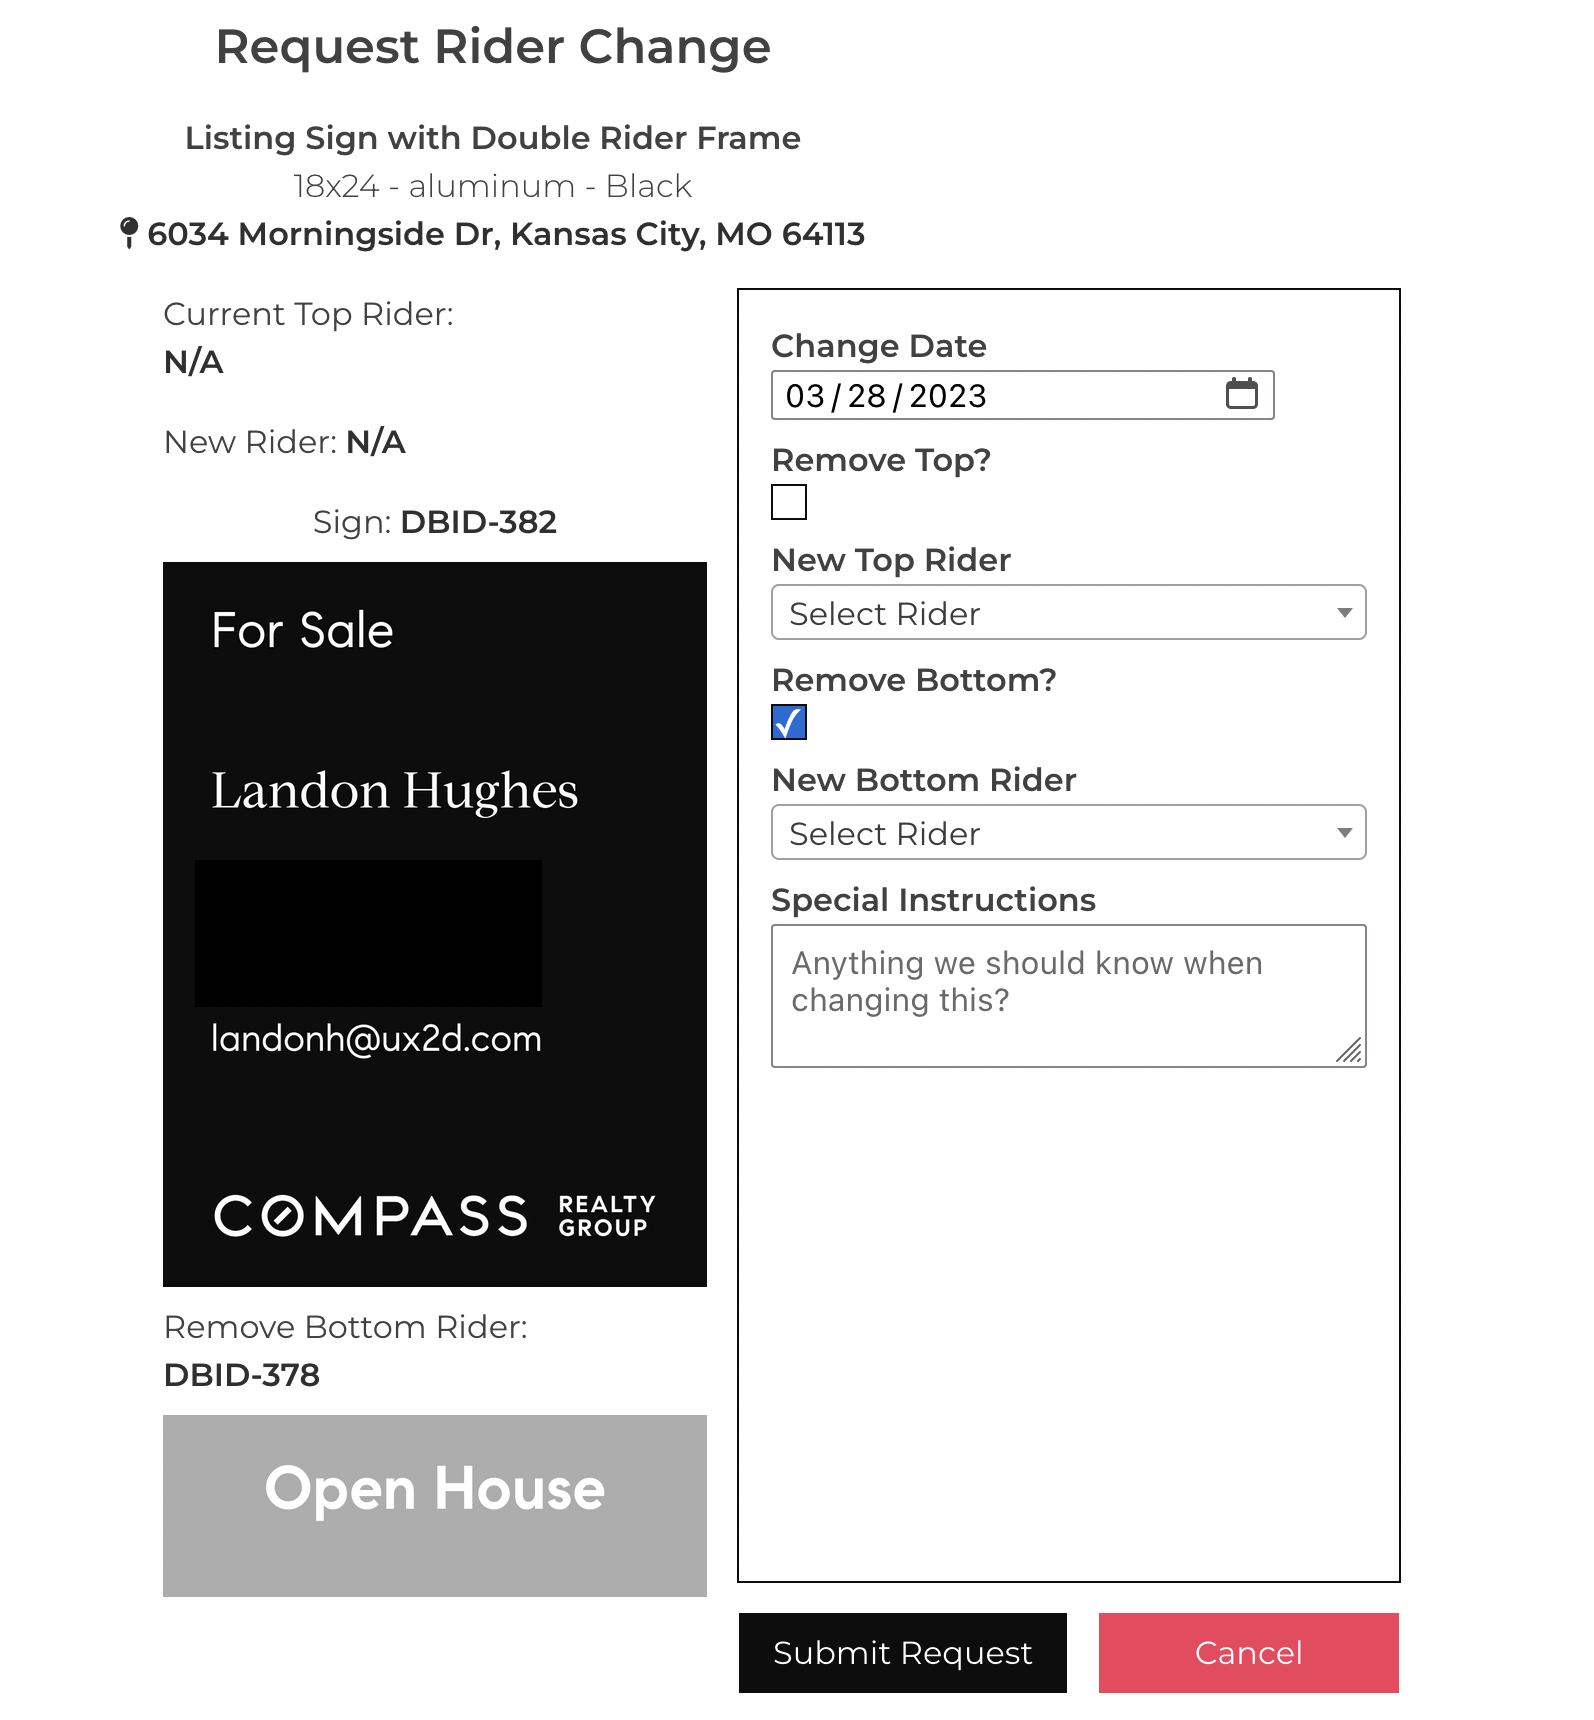
- Once all required fields have been filled out, hit "Submit Request".
- Please wait until one of our admins approves your request. You will receive a confirmation email shortly after the approval.
"I want to remove the sign I have installed."
- Click on "My Signs" on the navigation bar or the "My Signs" button on the home page.
- You will now see a dashboard-like interface. Click on the "My Installed Signs" tab.
- If a sign has been installed, you will be given the ability to schedule a removal for your sign. This is indicated by a red "Schedule Removal" button beneath your sign.
- Click "Schedule Removal".
- You will be directed to a page to schedule removal of your sign. Go ahead and fill out the "Removal Date" and any special instructions you may have.
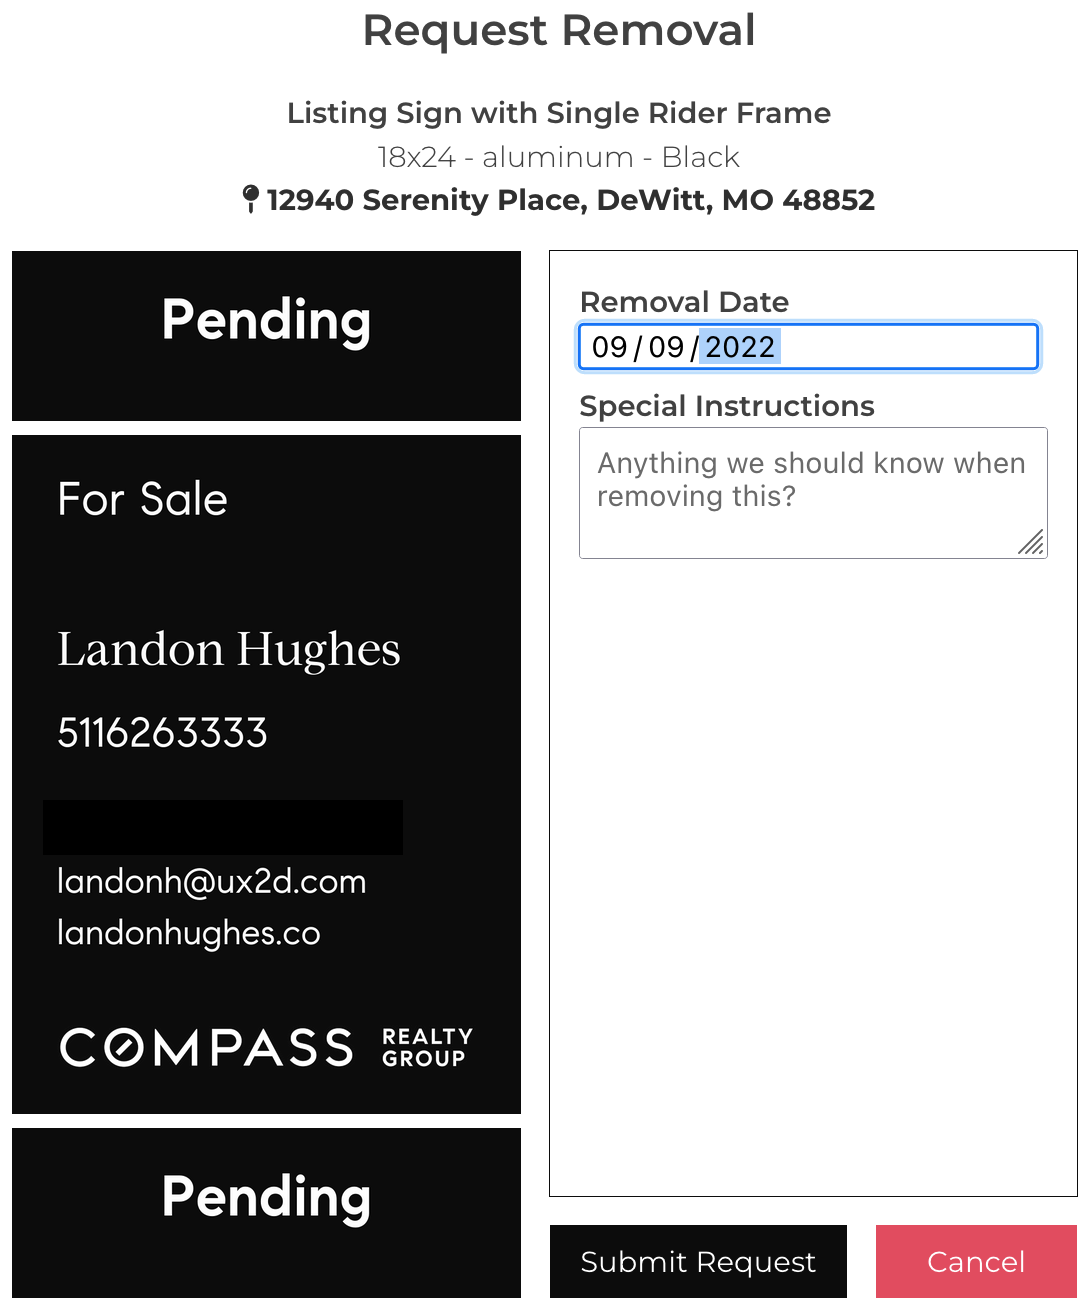 Note: We do not remove signs on weekends or national holidays.
 - Once all information has been filled out, hit "Submit Request".
- If you land back on "My Signs", you have successfully submitted a removal request! Once the removal has been approved, you will be sent a confirmation email. You will also be sent an email when the removal is complete 👍.
"I have a sign that I installed myself. Can someone pick this up for me?"
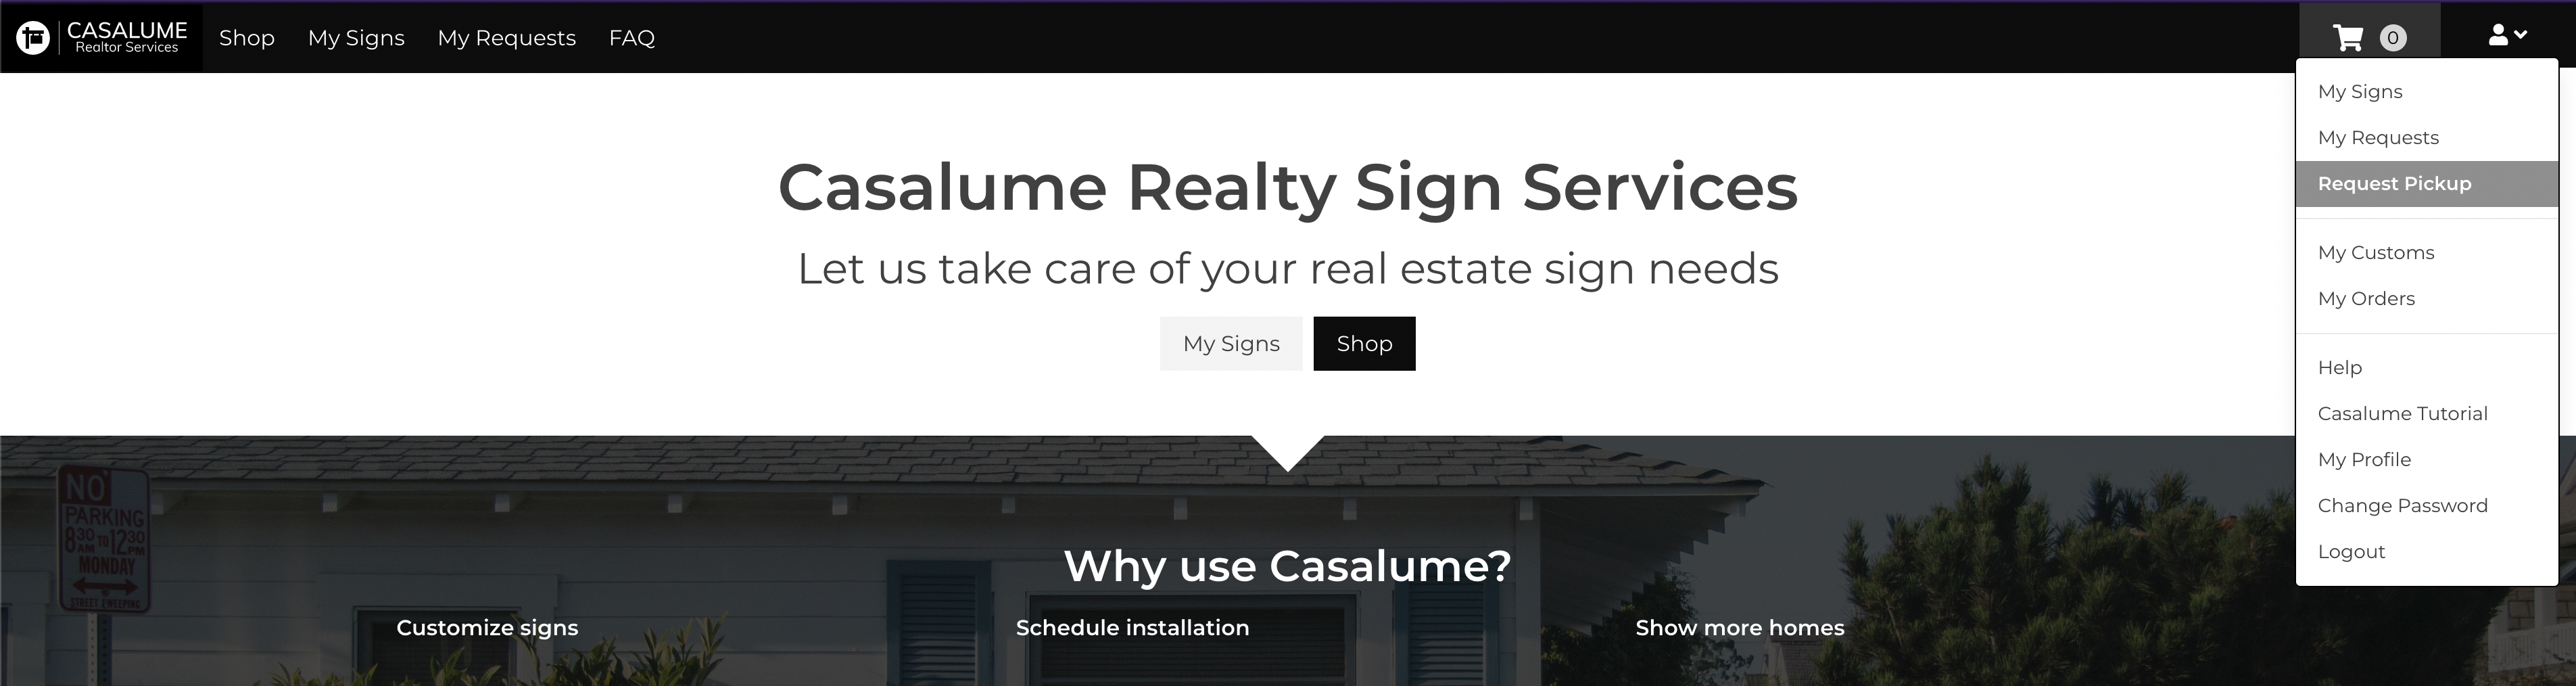
- Hover over the person icon in the top right corner of your screen. You will then see a dropdown.
- Click on "Request Pickup".
- From here, you will see a form asking where you want your sign picked up from, what it looks like, and any special instructions you have for us.
- Go ahead and fill out the form.
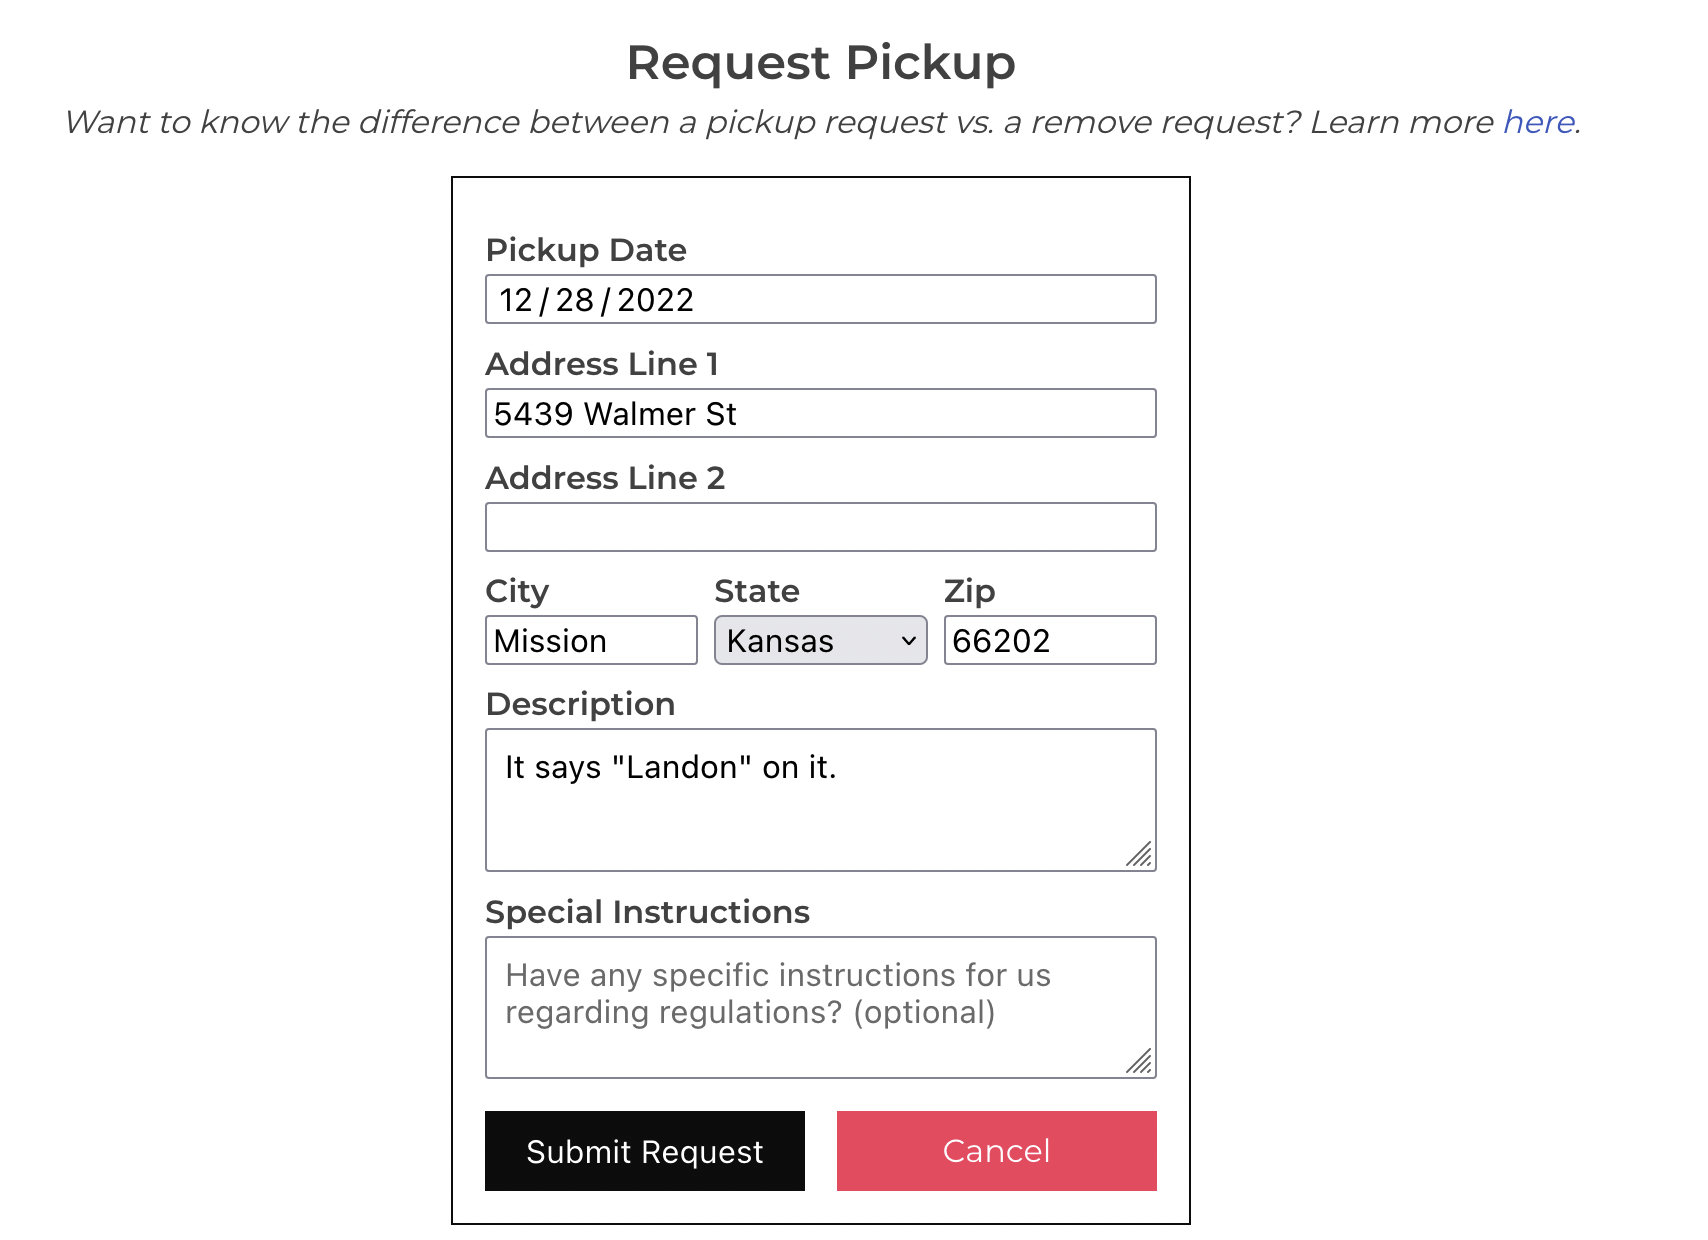
- If you see a red outline on any fields it means one of three things: The required field wasn't filled in, what you entered in isn't valid, or the date is invalid.
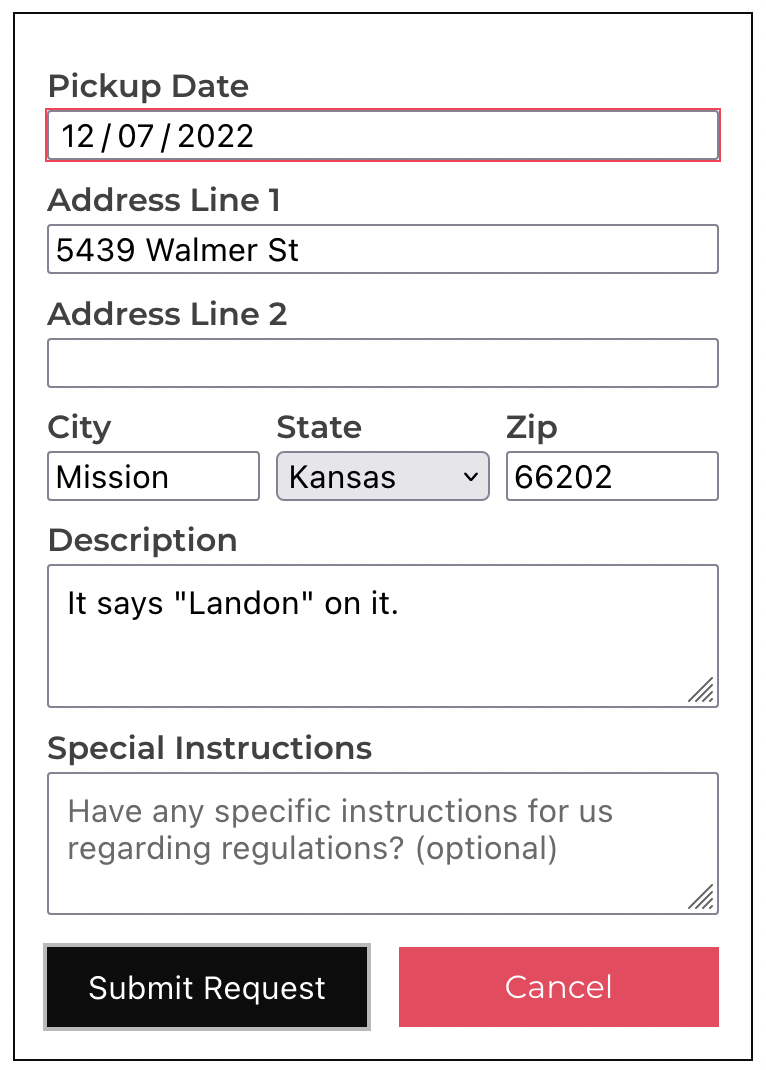
- Please double-check each field. If the date is invalid, your request needs to be scheduled one day in advance. In other words, if today is December 7th, I cannot request a pickup for December 7th. The earliest I can schedule a pickup is for December 8th. Note If there is an emergency pickup, please contact support@casalumesigns.com. One of us will get in touch with you shortly.
How do I see my current install requests, removal requests, and rider change requests?
- Click on My Requests in the navigation bar.
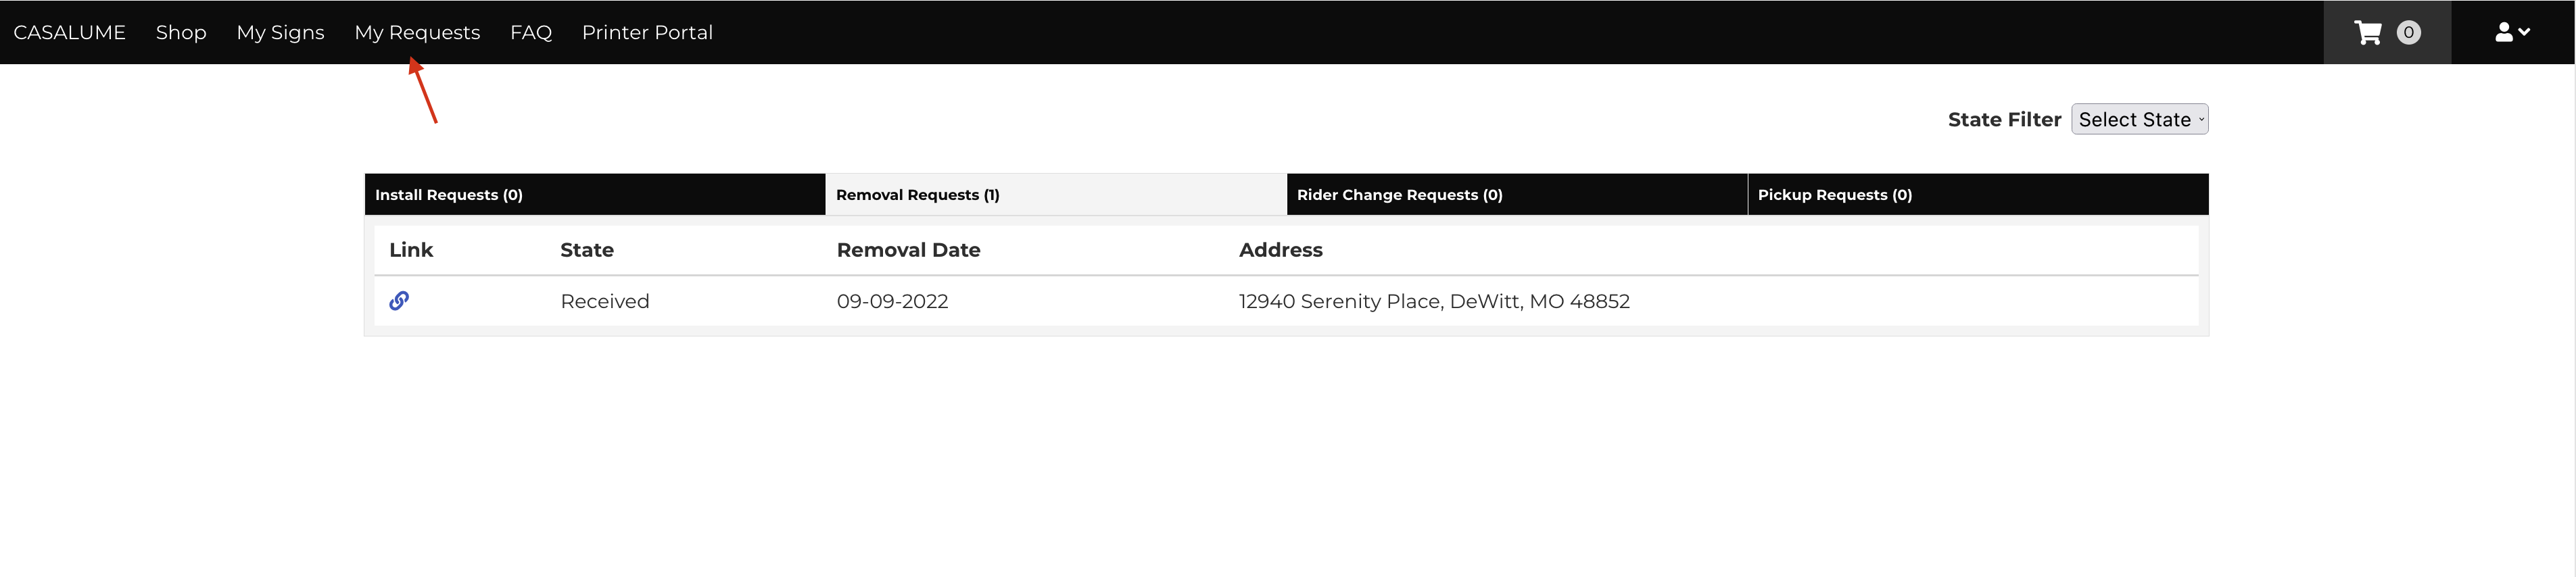
- Here, you will see a dashboard-like interface with all your installation requests, remove requests, and rider change requests.
- In the "State Filter", you can select requests that are in-progress, received, complete, and cancelled.

I want to buy a custom sign or rider. How do I do that?
- From the navigation menu, click on "Shop".

- This page is what we currently have for sale.
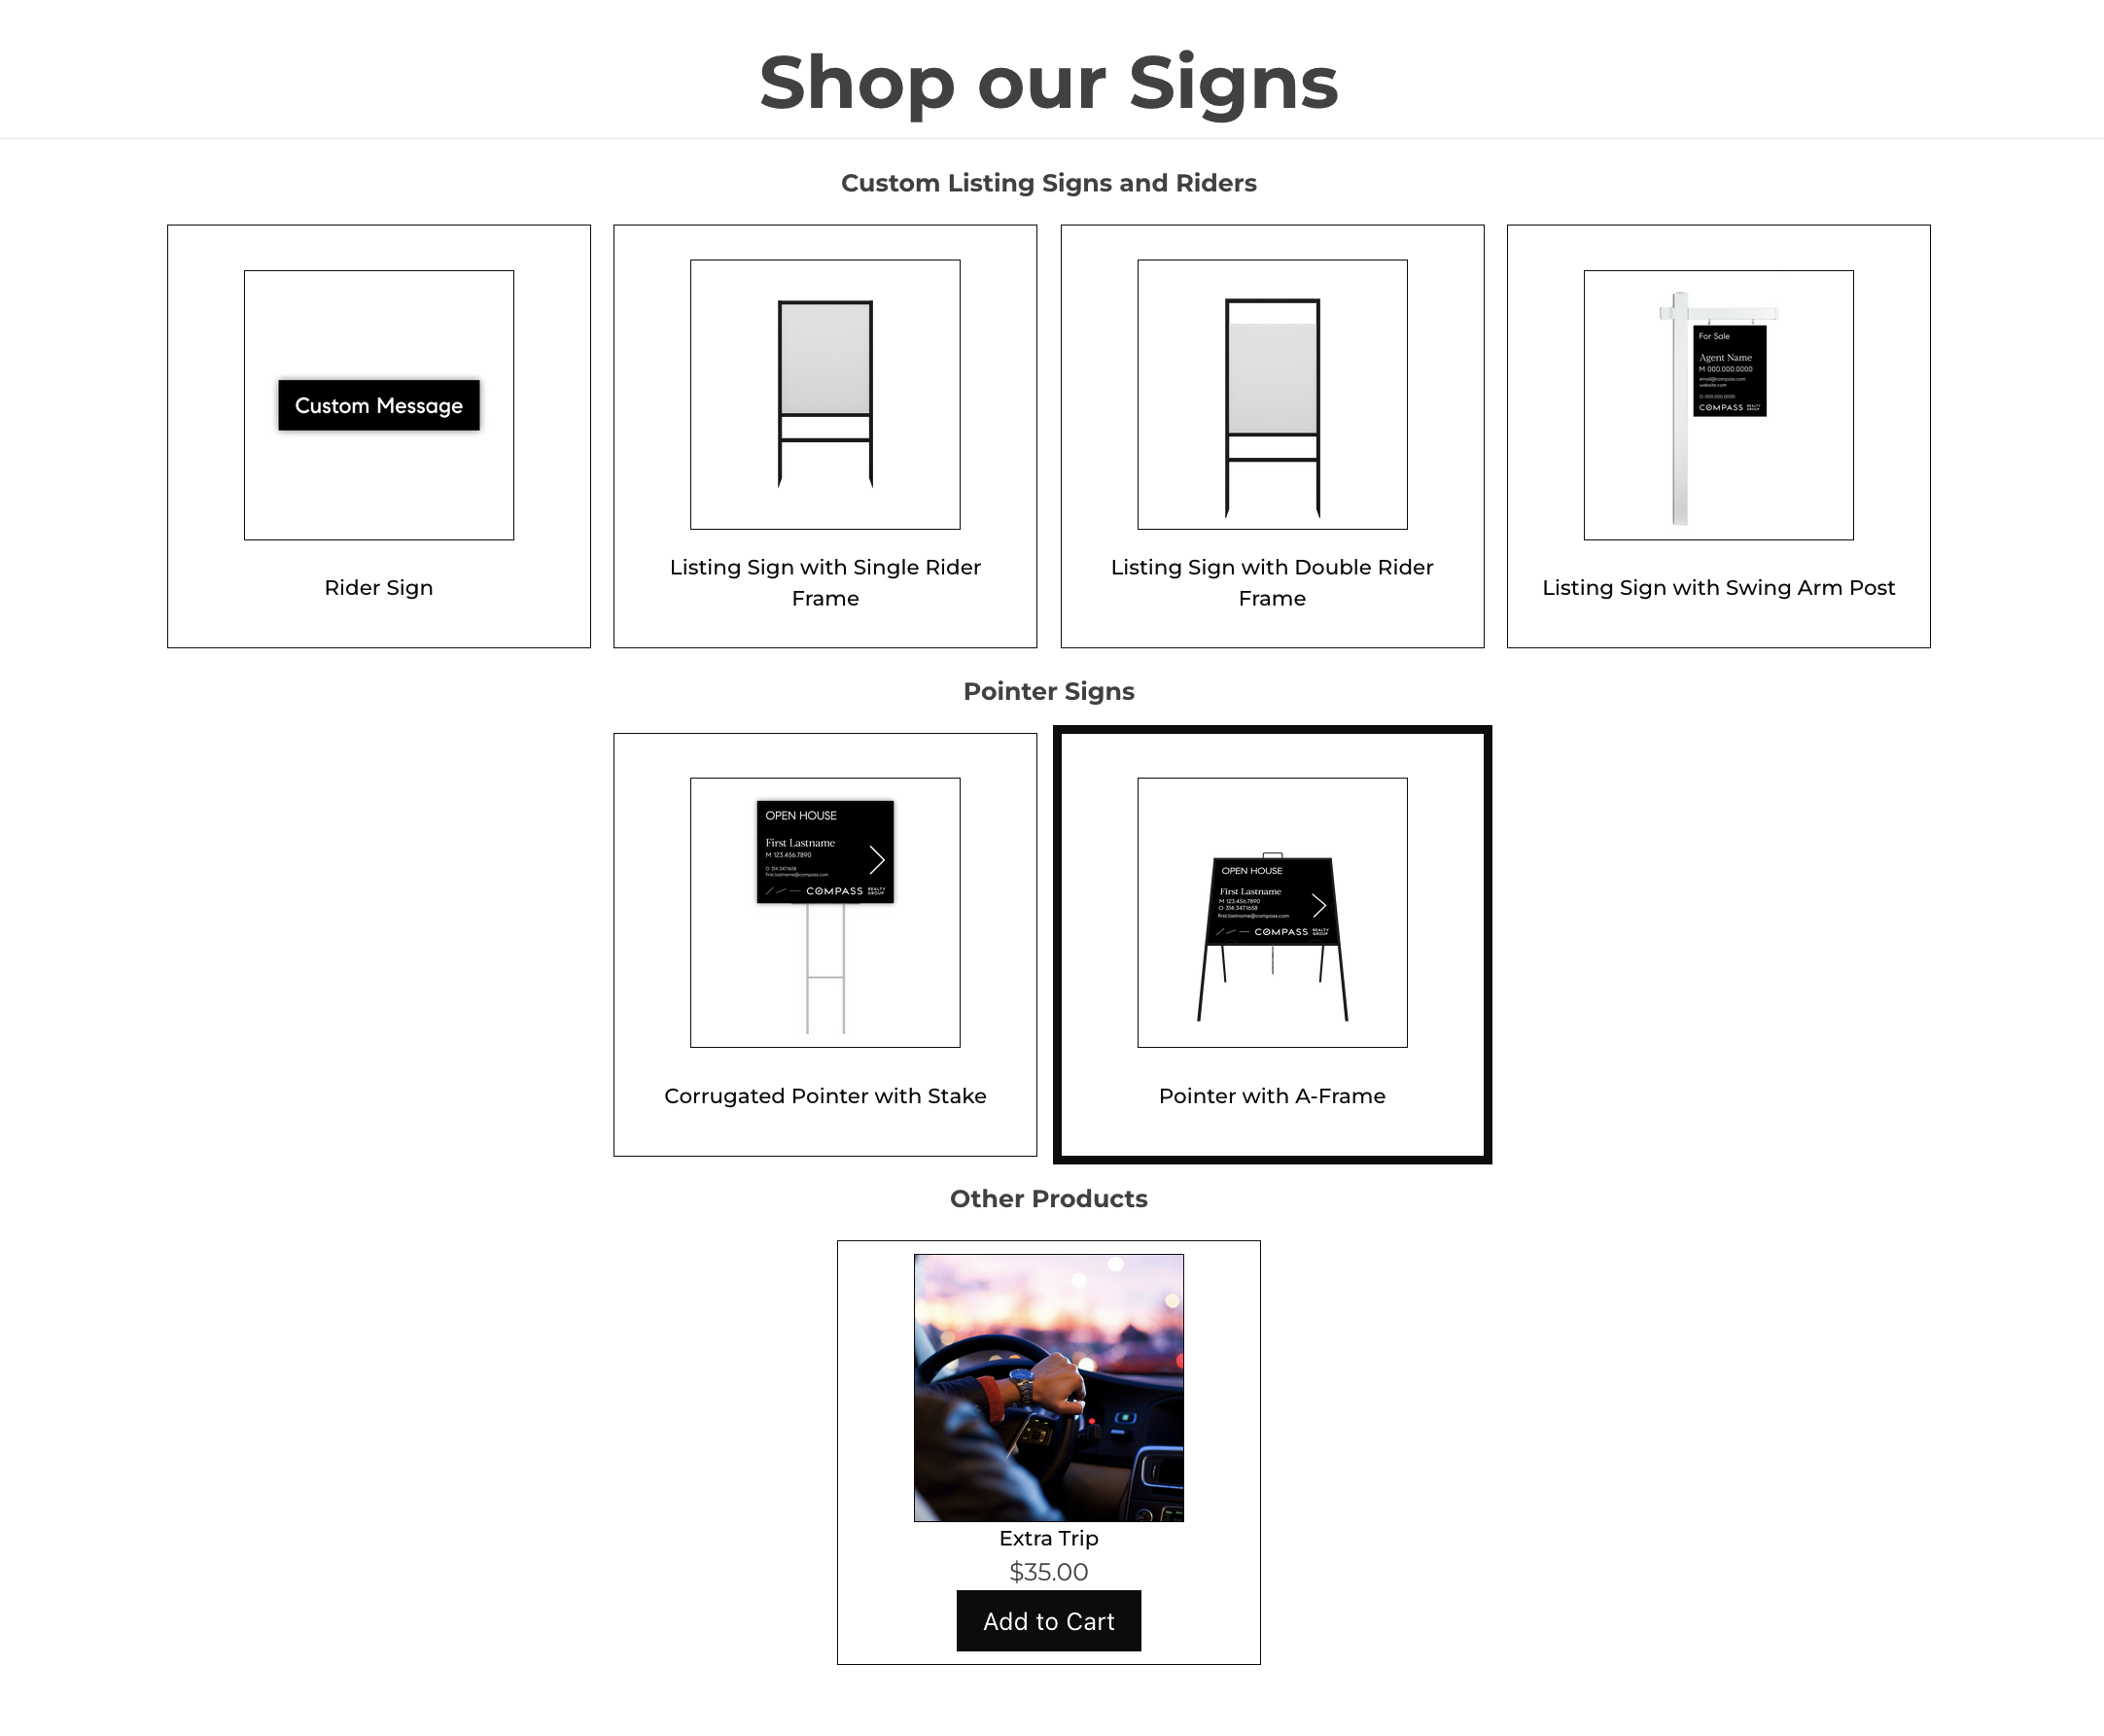
- Under "Custom Listing Signs and Riders", click on the sign or rider you'd like to customize. For this demonstration we'll be choosing "Listing Sign with Single Rider Frame".
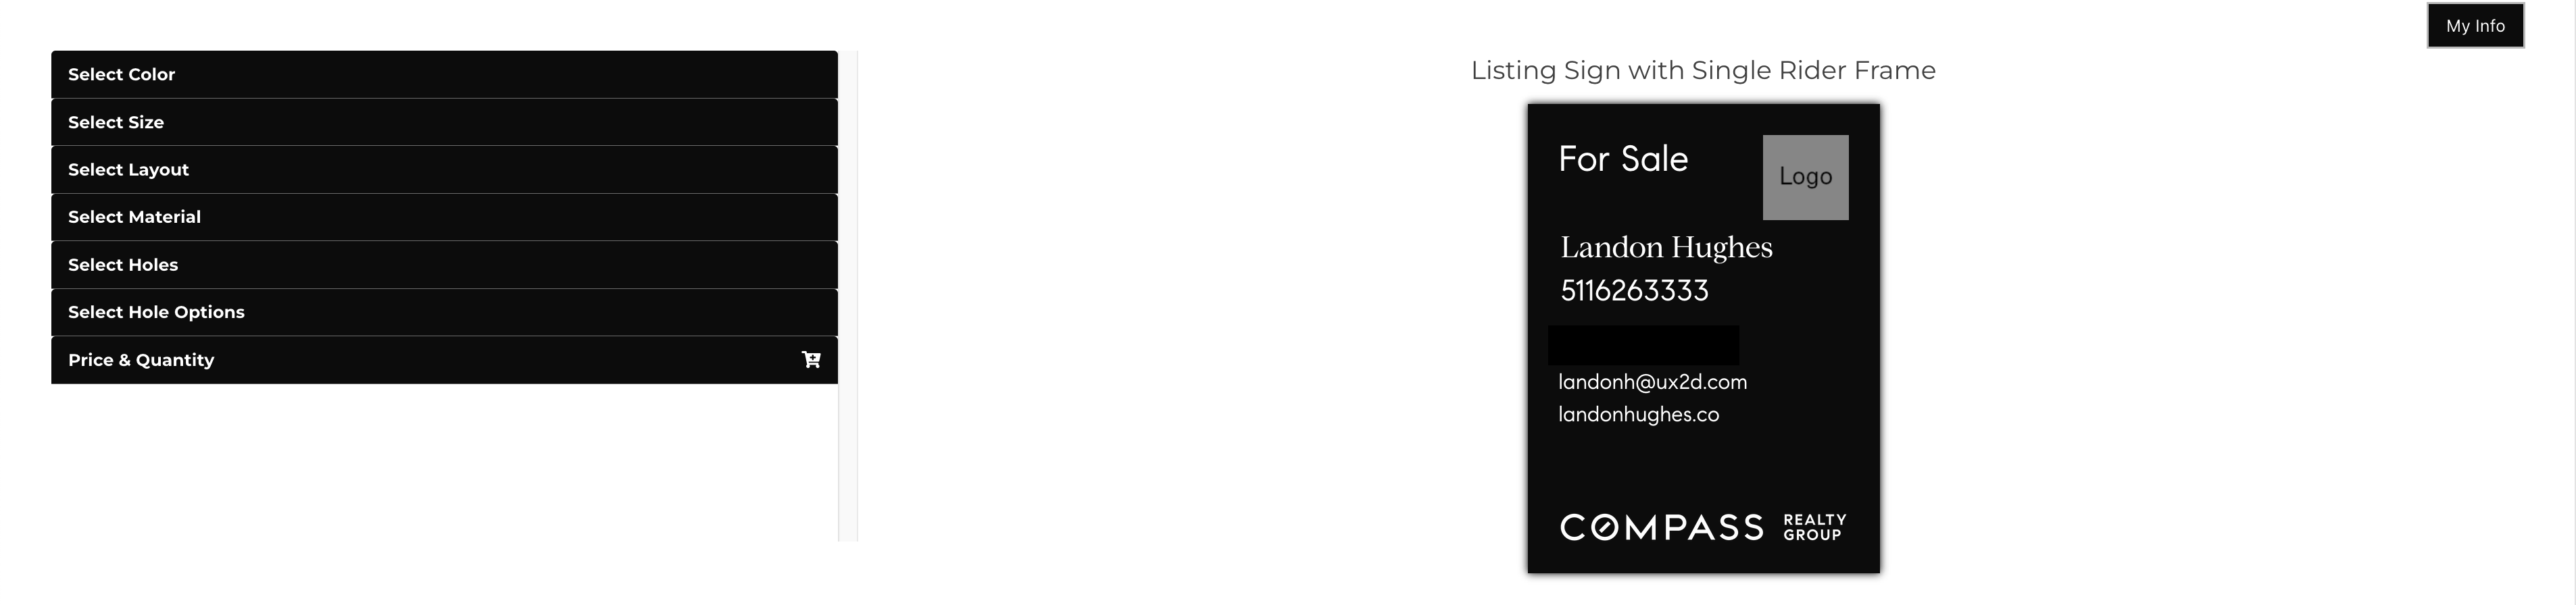
- This page is the customizer page. You can choose the color, size, layout, material, holes, and hole size of your desired sign.
- Go ahead and make the sign your own. You can even upload a logo by clicking on "logo" on your sign.
Note: The logo must either be a jpg or transparent png. If it's not, you will get an error adding to cart. - Please fill out all required information on the sign. This includes your agent name, phone number, office phone, email, and website. Please note, the required information changes whether you chose a sign or rider.
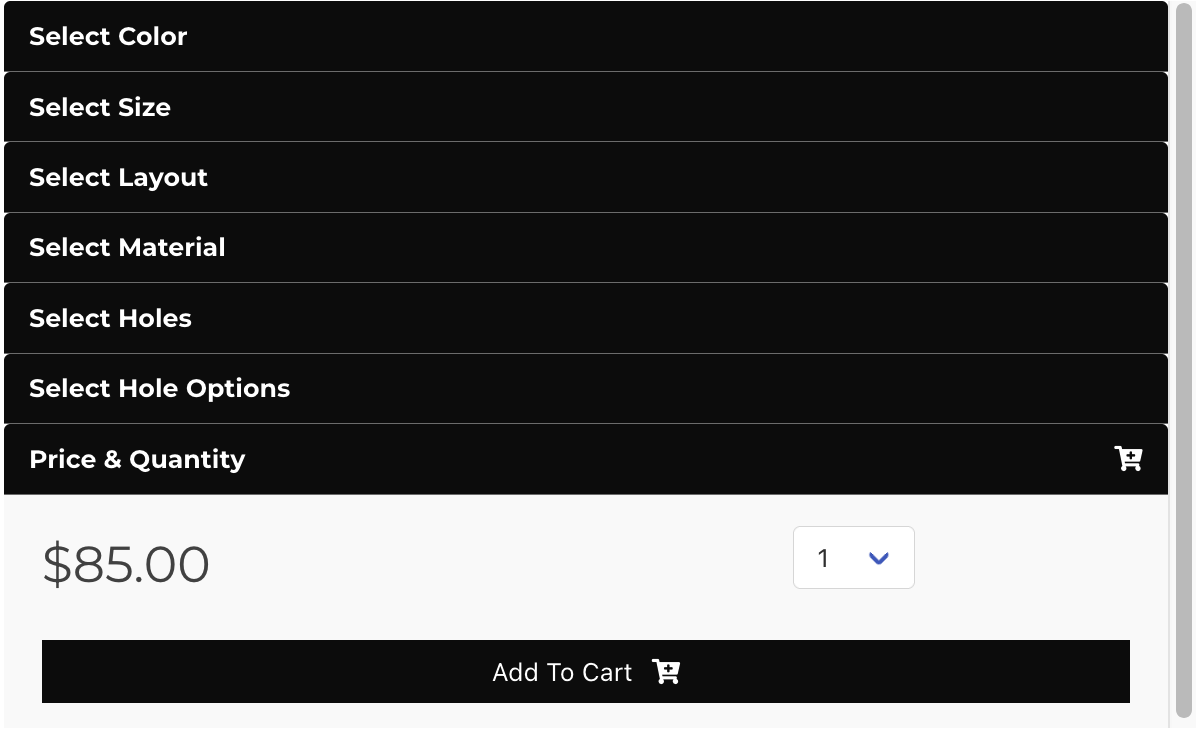
- If all looks good, under the "Price & Quantity Tab", please select how many you'd like, then click "Add To Cart".
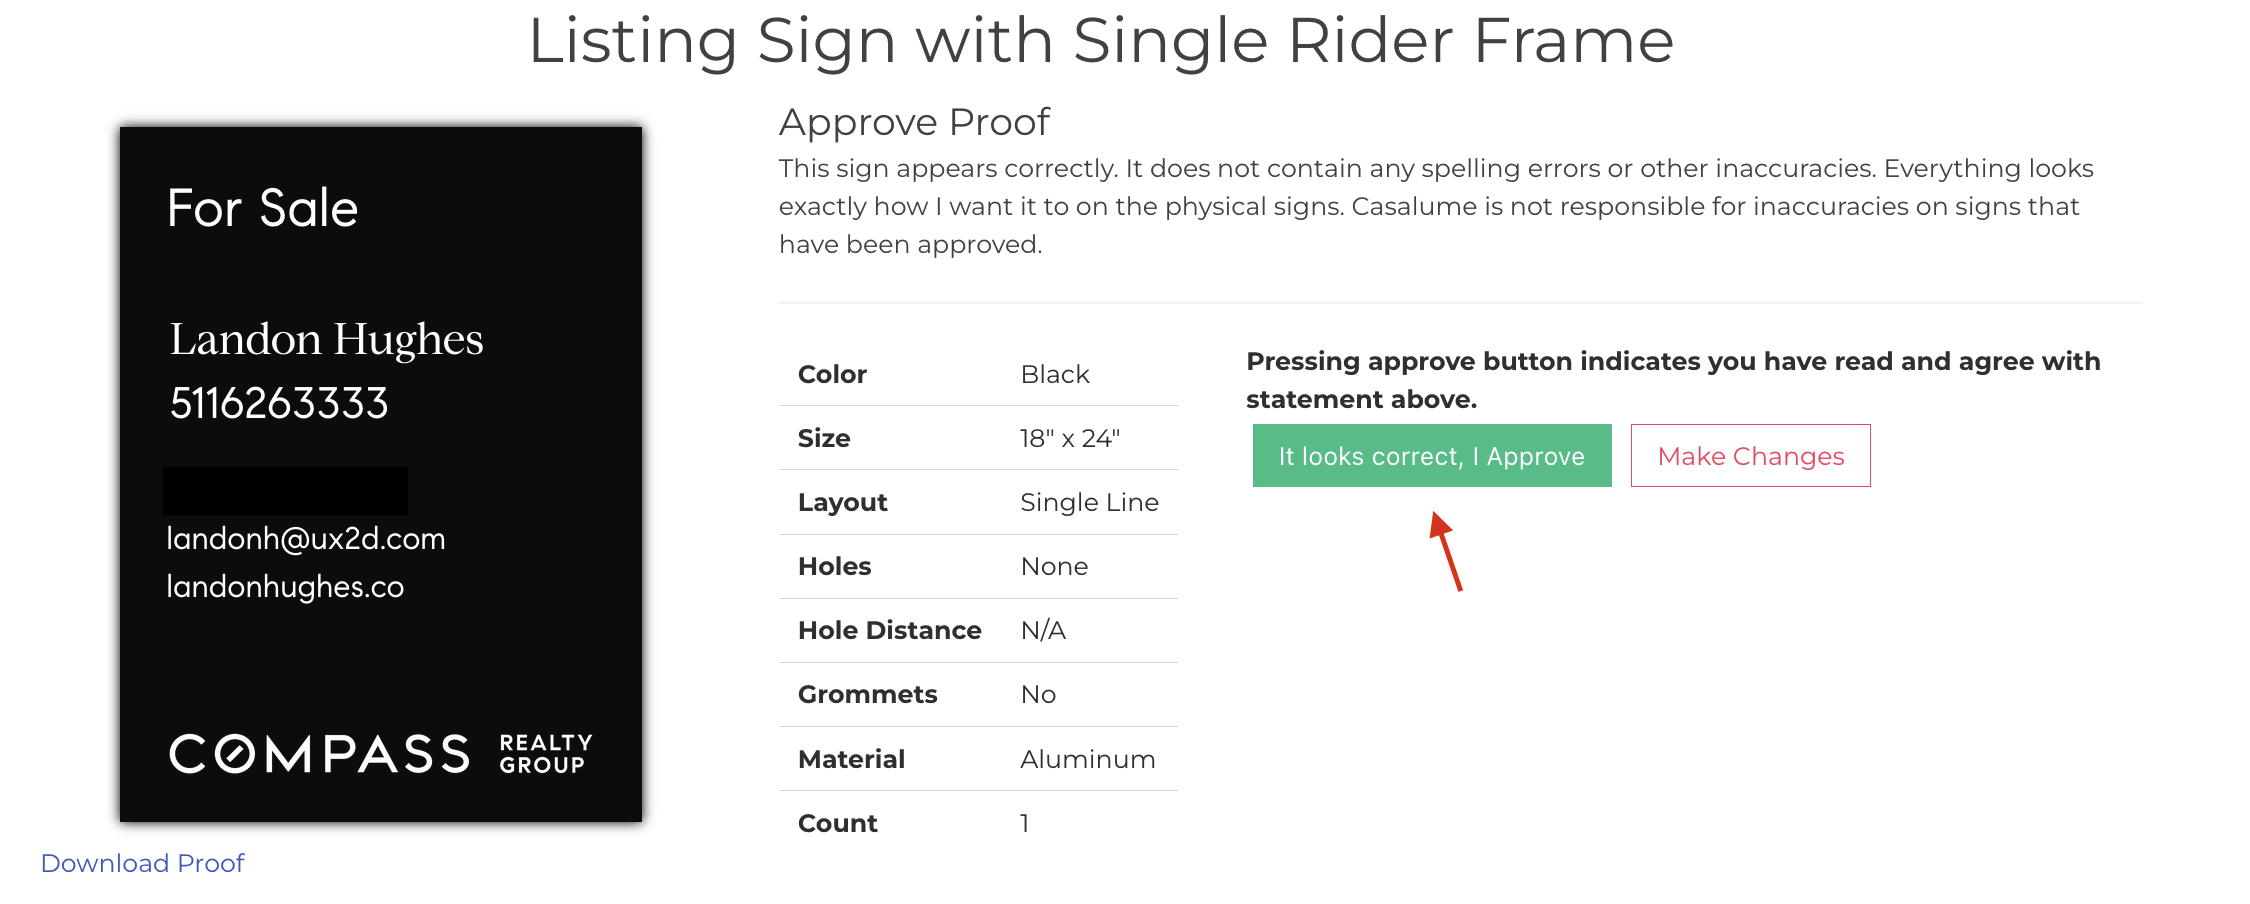
- This is the sign approval page. If all looks good, click "It looks correct, I approve" or "Make Changes" if you need to make a correction.
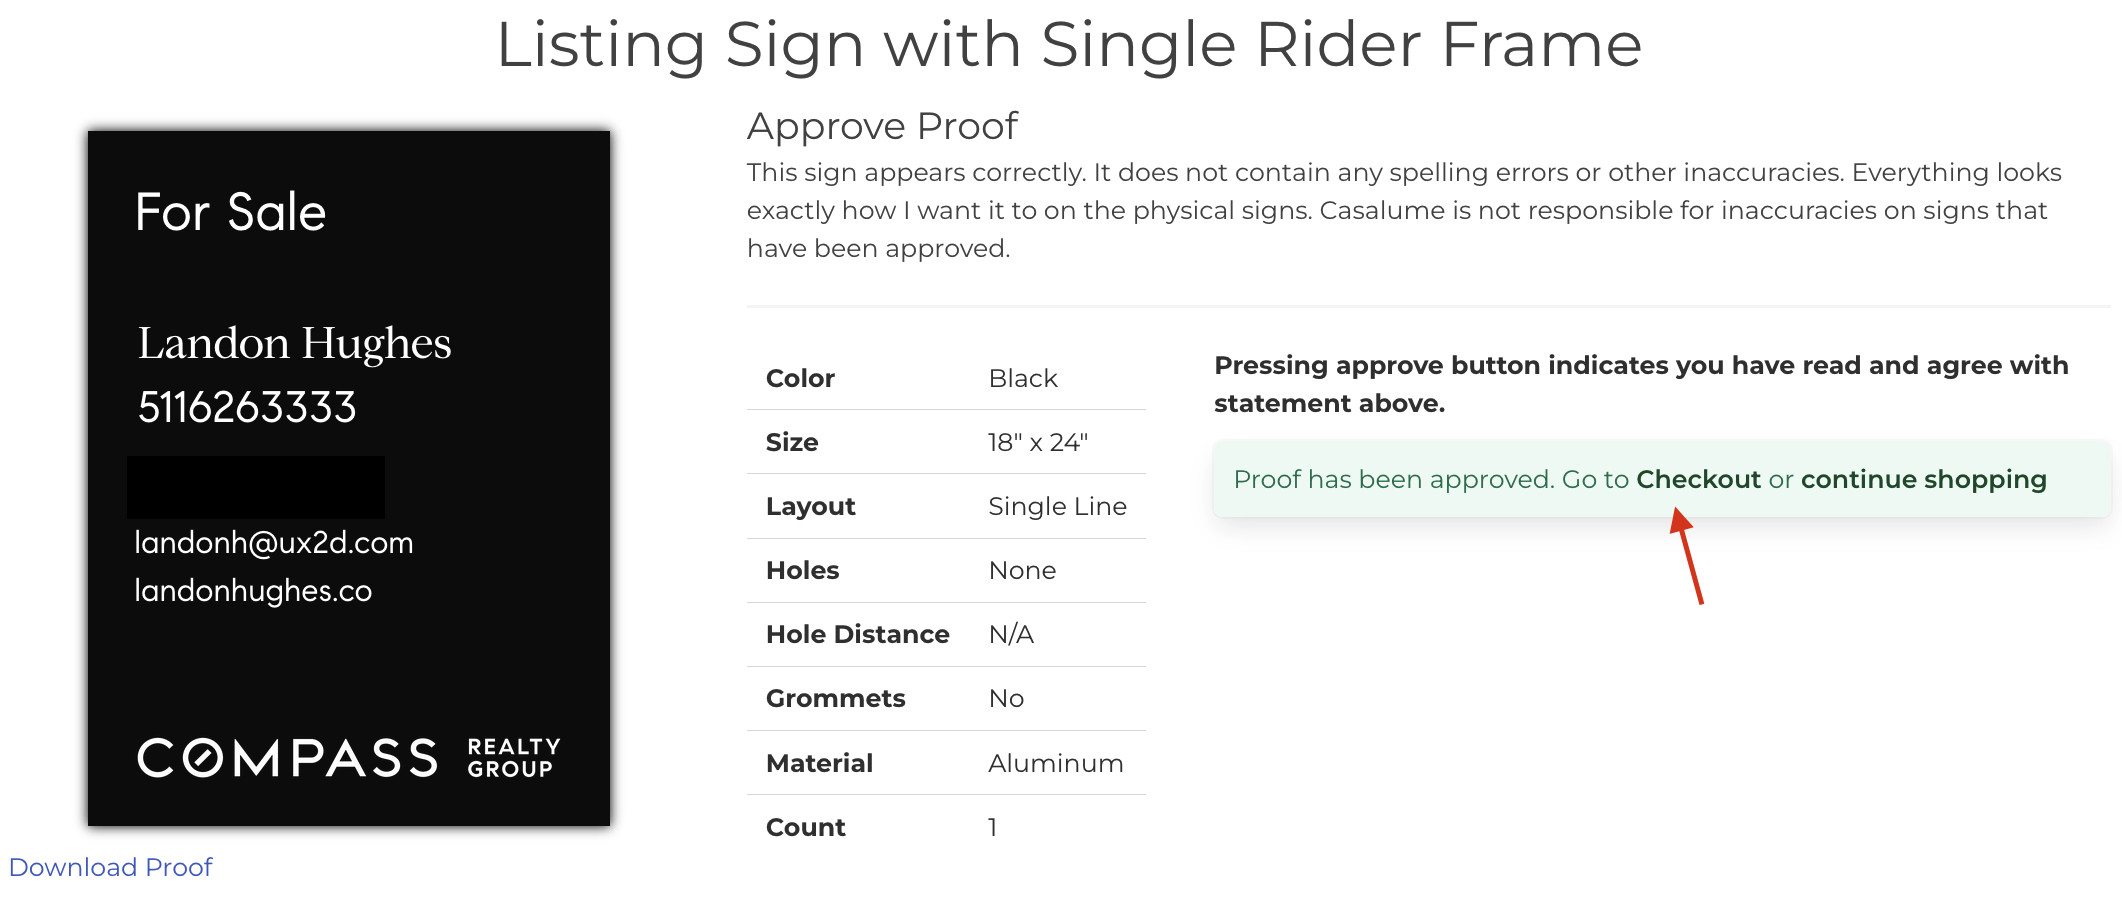
- If you selected "It looks correct, I approve", you will be given the options to "Checkout" or "continue shopping".
- Click "checkout" if you are ready to place your order.
- On this page you will see the contents of your order.
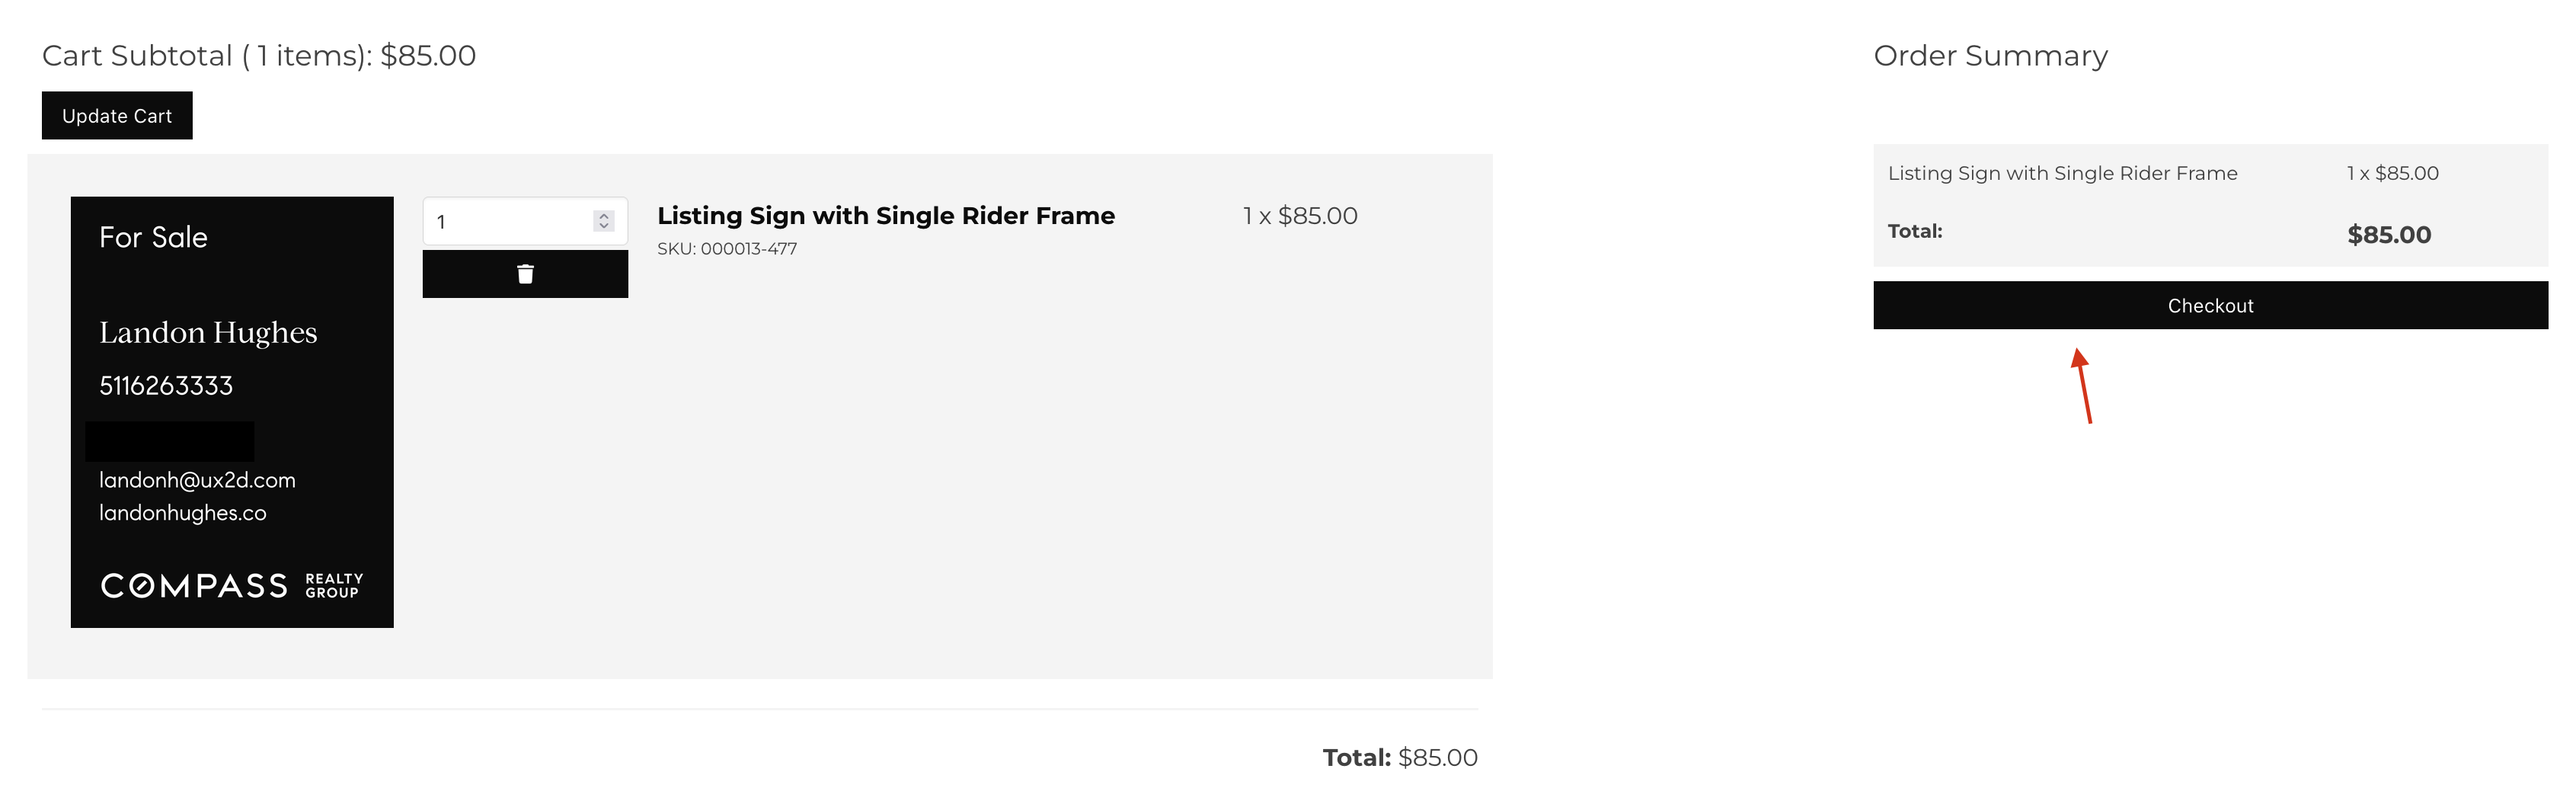
- Click "Checkout". You will be taken to our Stripe checkout page.
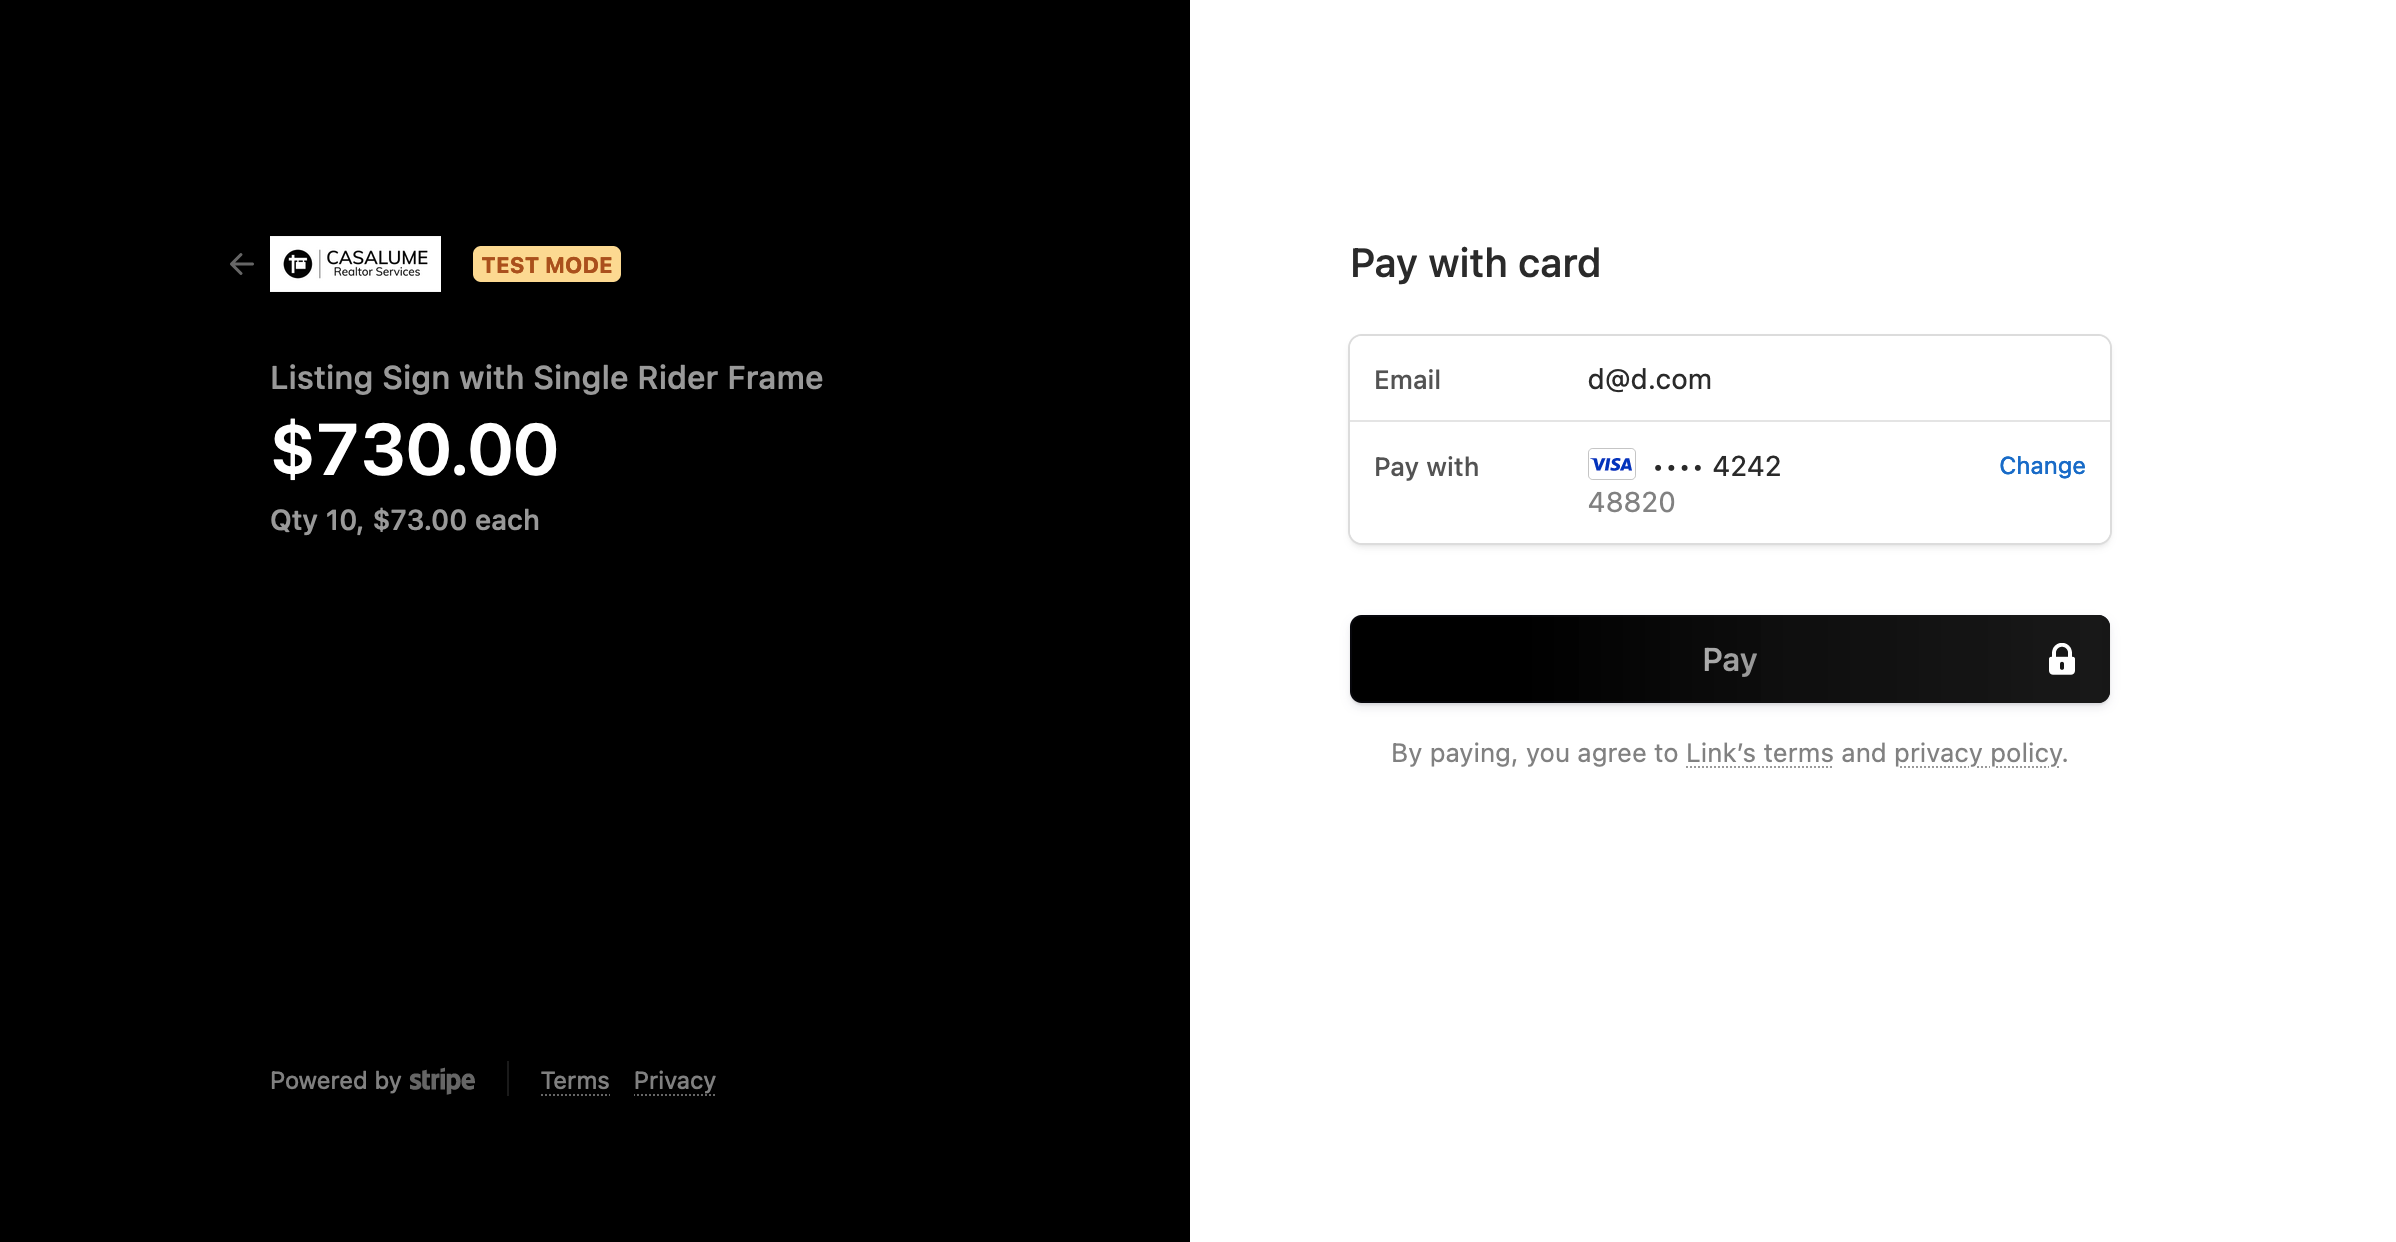
- Please enter your payment information then click "Pay".
- You have successfully bought a custom sign! You will receive an email with the details of your order.
- Once we receive your sign back from manufacturing, you will receive another email saying your sign has been checked-in. Still can't find what you're looking for? Email: support@casalumesigns.com.
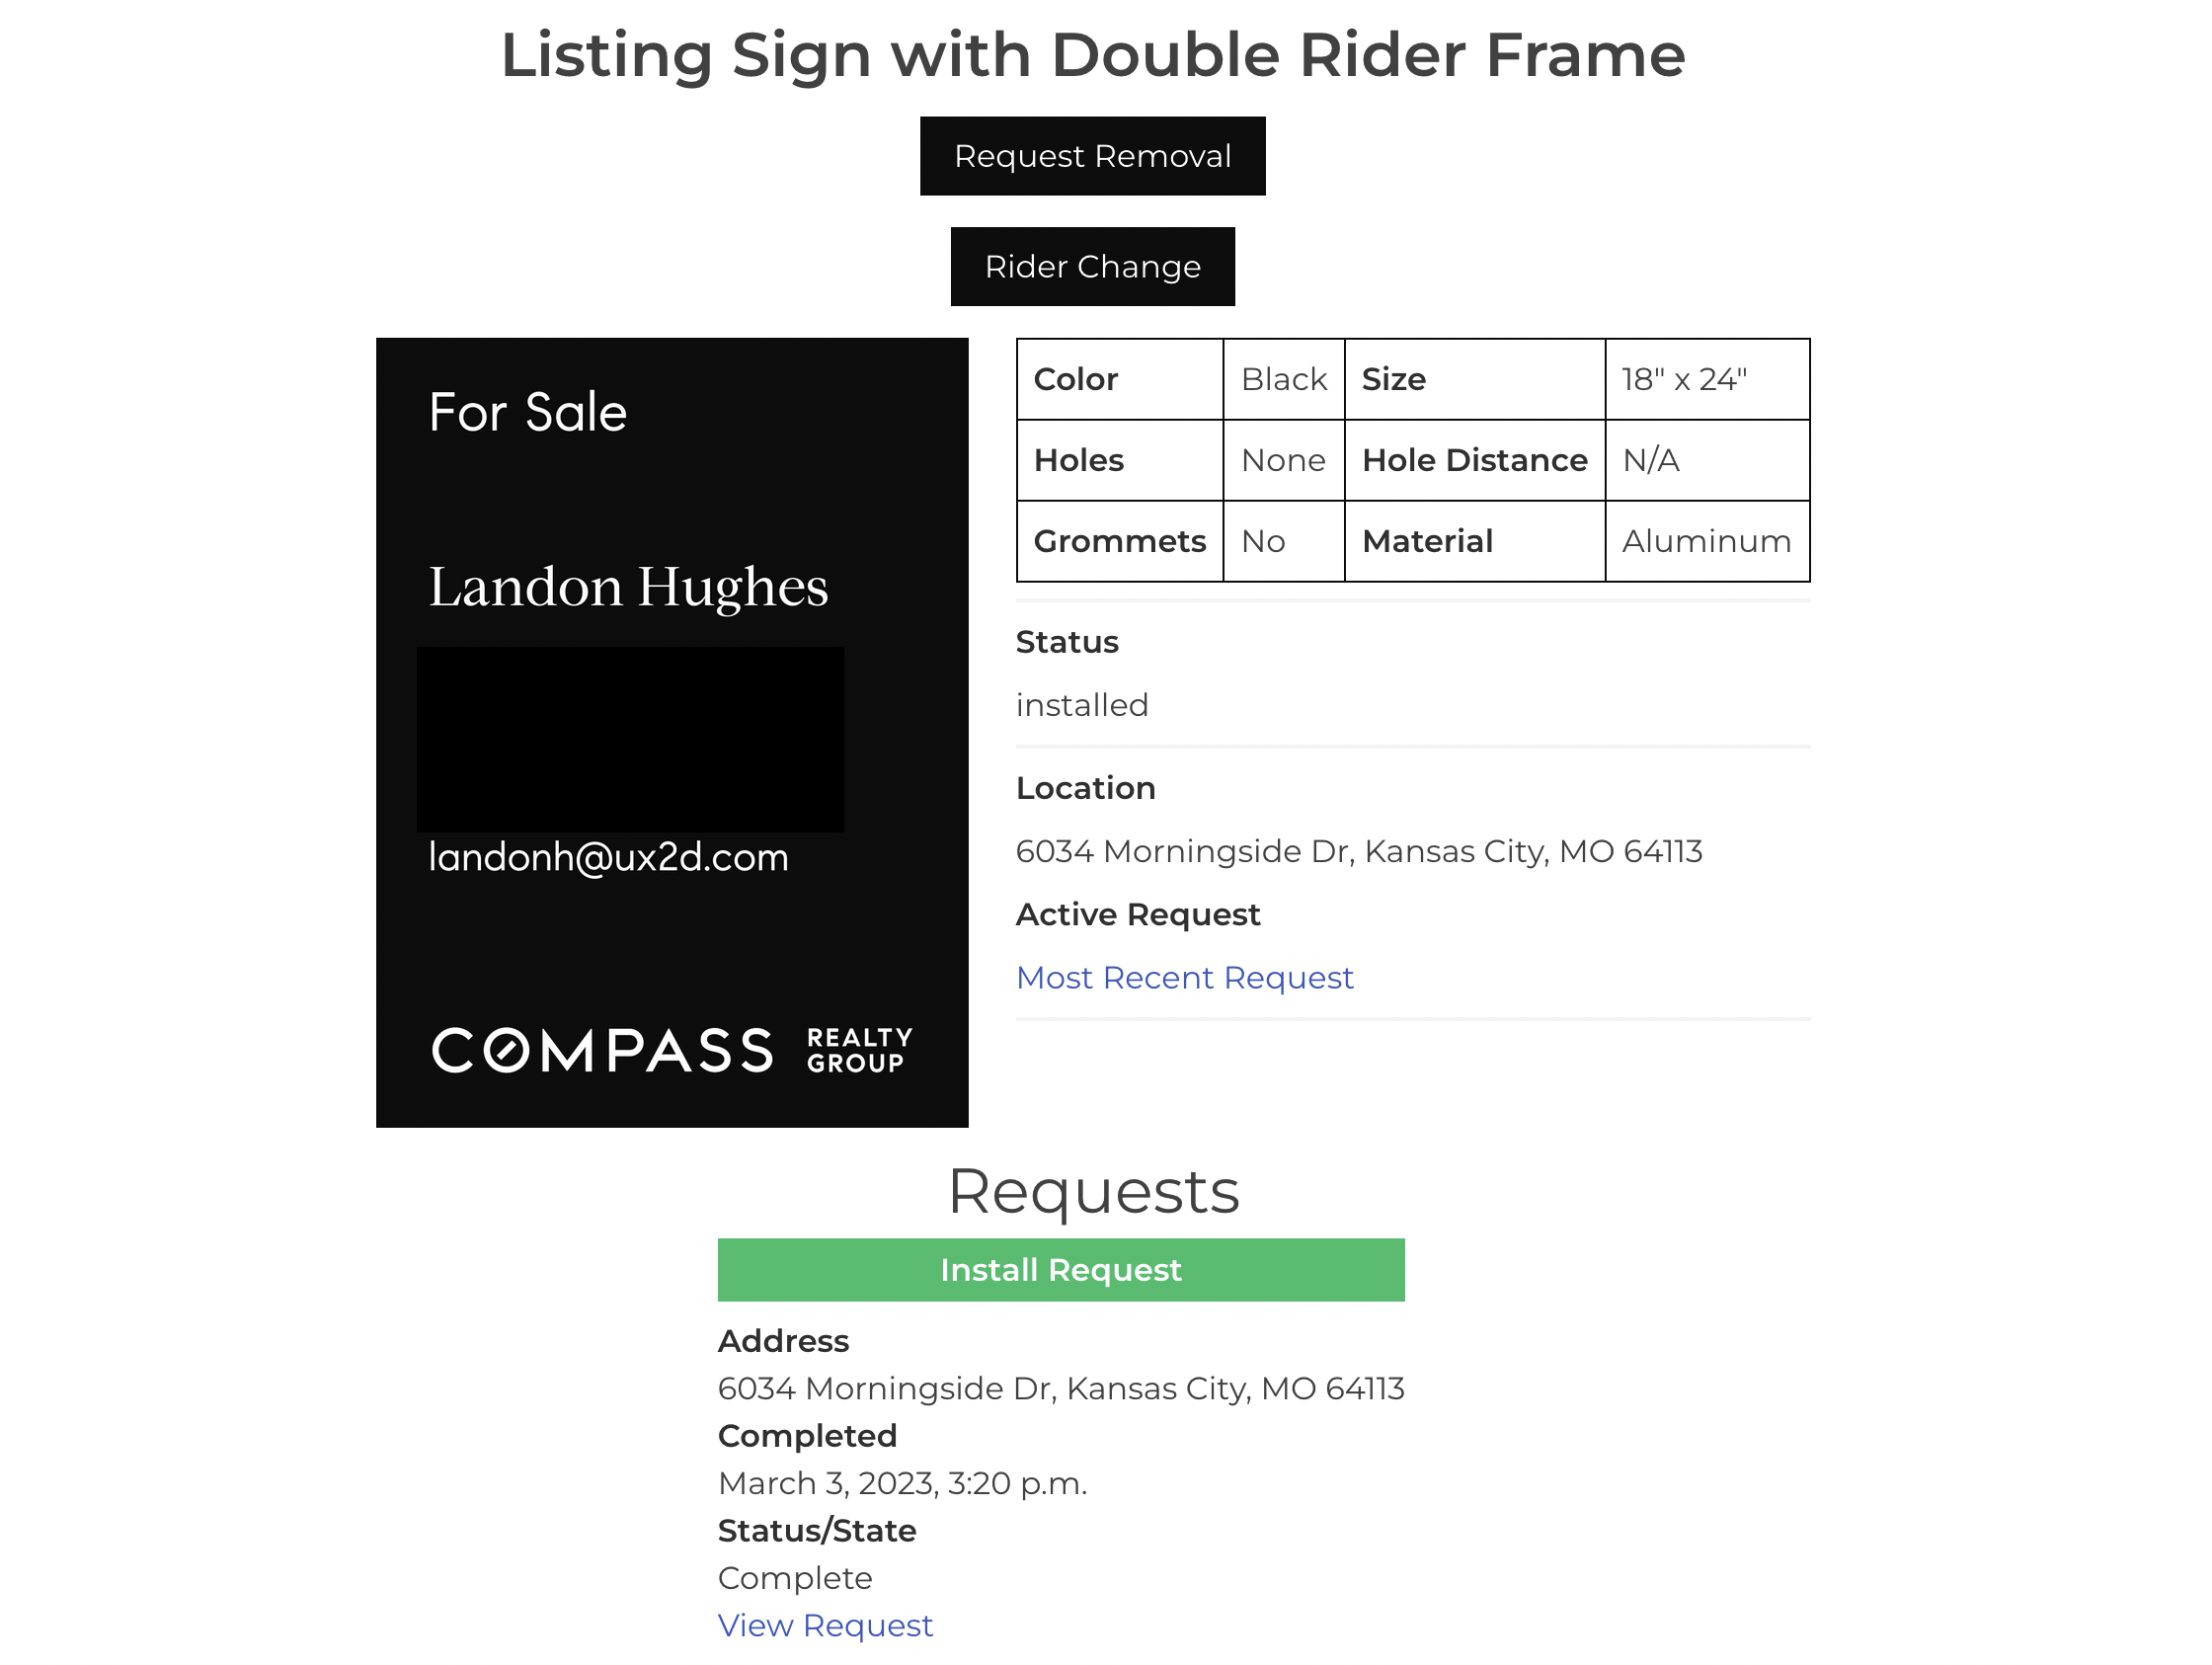
How can I view more information about one of my signs?
- From the "My Signs" page, click on any of the three tabs. For this example, we will go with the "My Installed Signs" tab.
 .
. - Click on the sign image you'd like to view more information about.
- You will be taken to a page with more details about your sign. This includes things like it's whereabouts, sign attributes, in addition to its status and location.
 .
.
How can I track the progress of one of my requests?
- Click on "My Requests" in the navigation bar.
- You are then brought to a page with all of your install requests, remove requests, change requests, and pickup requests.
Go ahead and find the request you'd like to know more about and click the link icon.

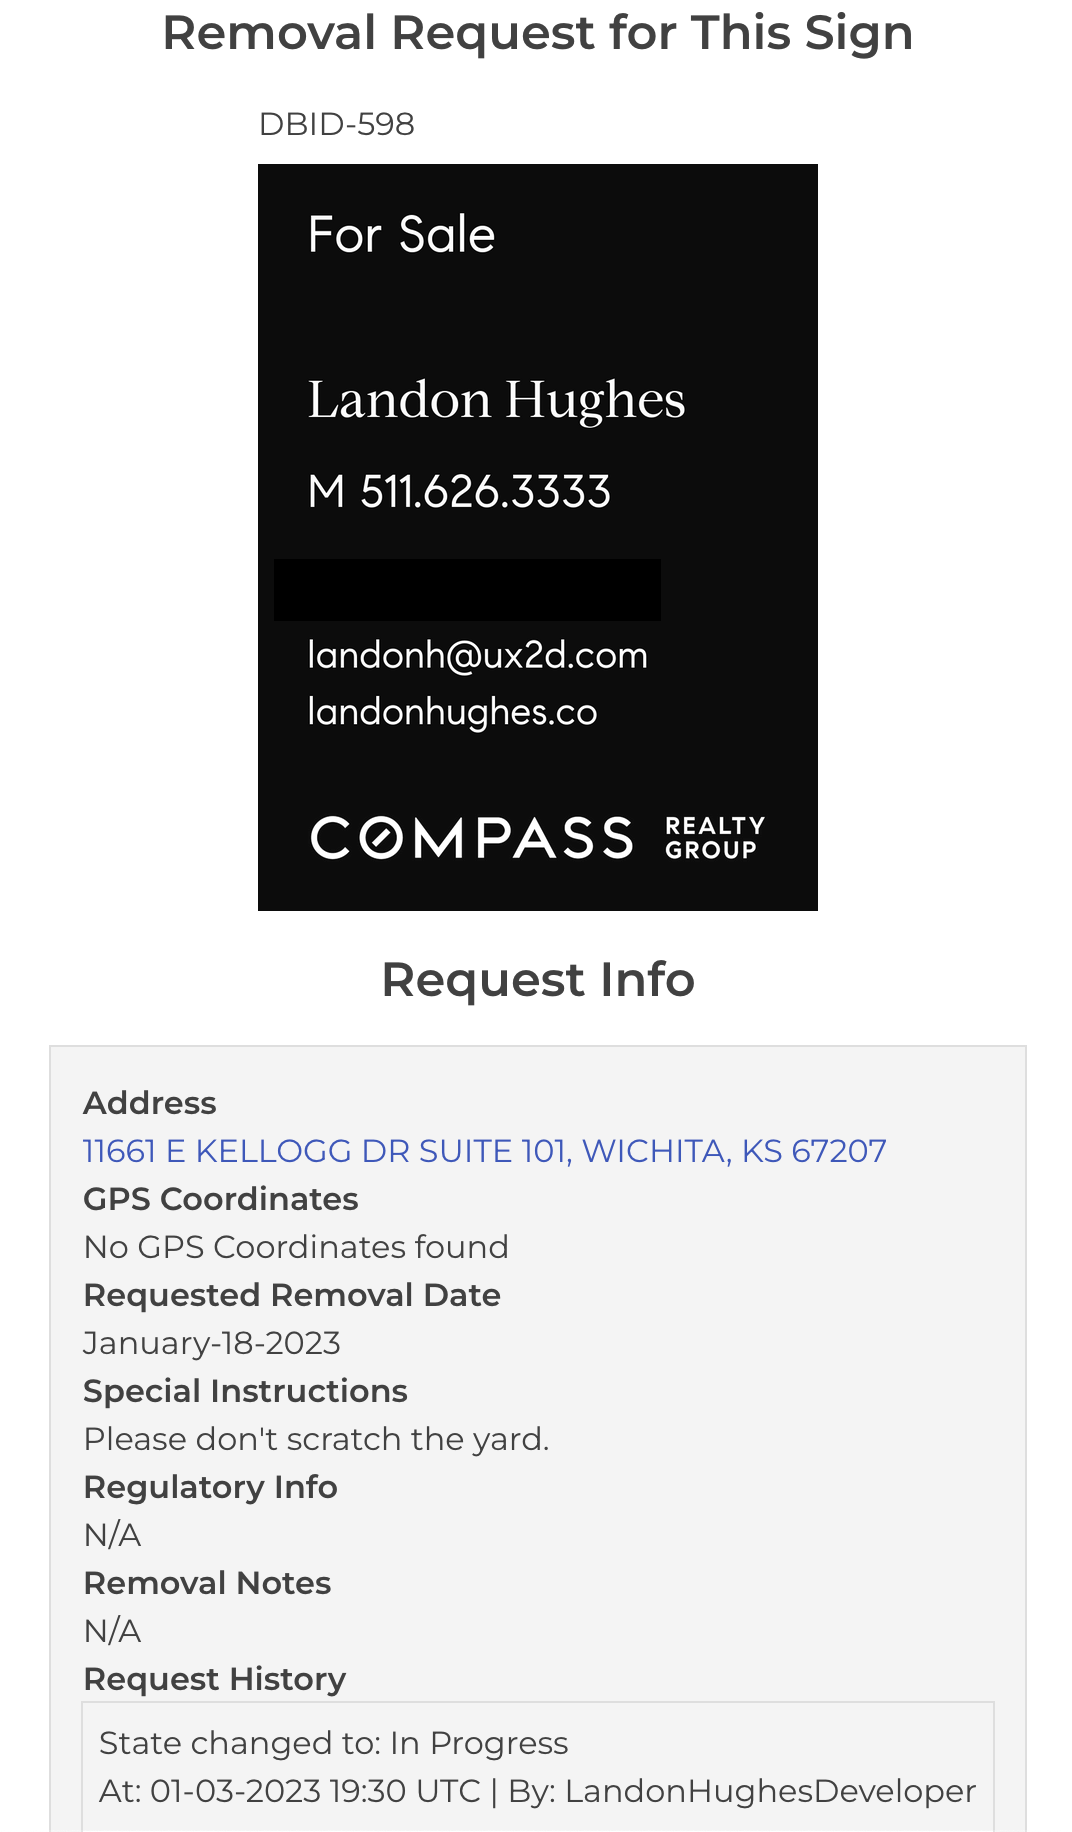
- On this page, you will find the address for the request, gps coordinates, the date you picked for the request, the special instructions you specified, regulatory info, and notes if the request was fulfilled. In addition to all of that, you can also see the history of your request.
The history includes any updates made to your request. Lets say an installer fulfilled your request; the request history would reflect that in addition to any corrected mistakes. The request history would also show any signs and/or riders removed, picked up, installed, in addition to any rider changes.